This online journal entry exists to pull notes I have taken on this topic during different art history and fine art courses I have taken, and also references different online sources that discuss this topic.
FORM + CONTENT + CONTEXT are interconnected elements that contribute to the overall meaning and interpretation of a work of art.
UNDERSTANDING these elements can help individuals to appreciate art more fully.
FORM
~
FORM ~
FORM…
Dr. Dorothy Barenscott, referencing Dr Robert Belton, in her 2010 blog post titled “FOCUS ON RESEARCH| THE ELEMENTS OF ART: FORM, CONTENT, AND CONTEXT” notes that FORM represents ‘HOW’ the work is.
In short, FORM asks the questions >
What can you say about an artwork in regards to the elements of art (line, shape, form, space, texture, color, and value) or the principles of design (balance, contrast, emphasis, movement, pattern, rhythm, and unity/variety)?
How can we analyze the visual qualities of the artwork?
The Elements of Art
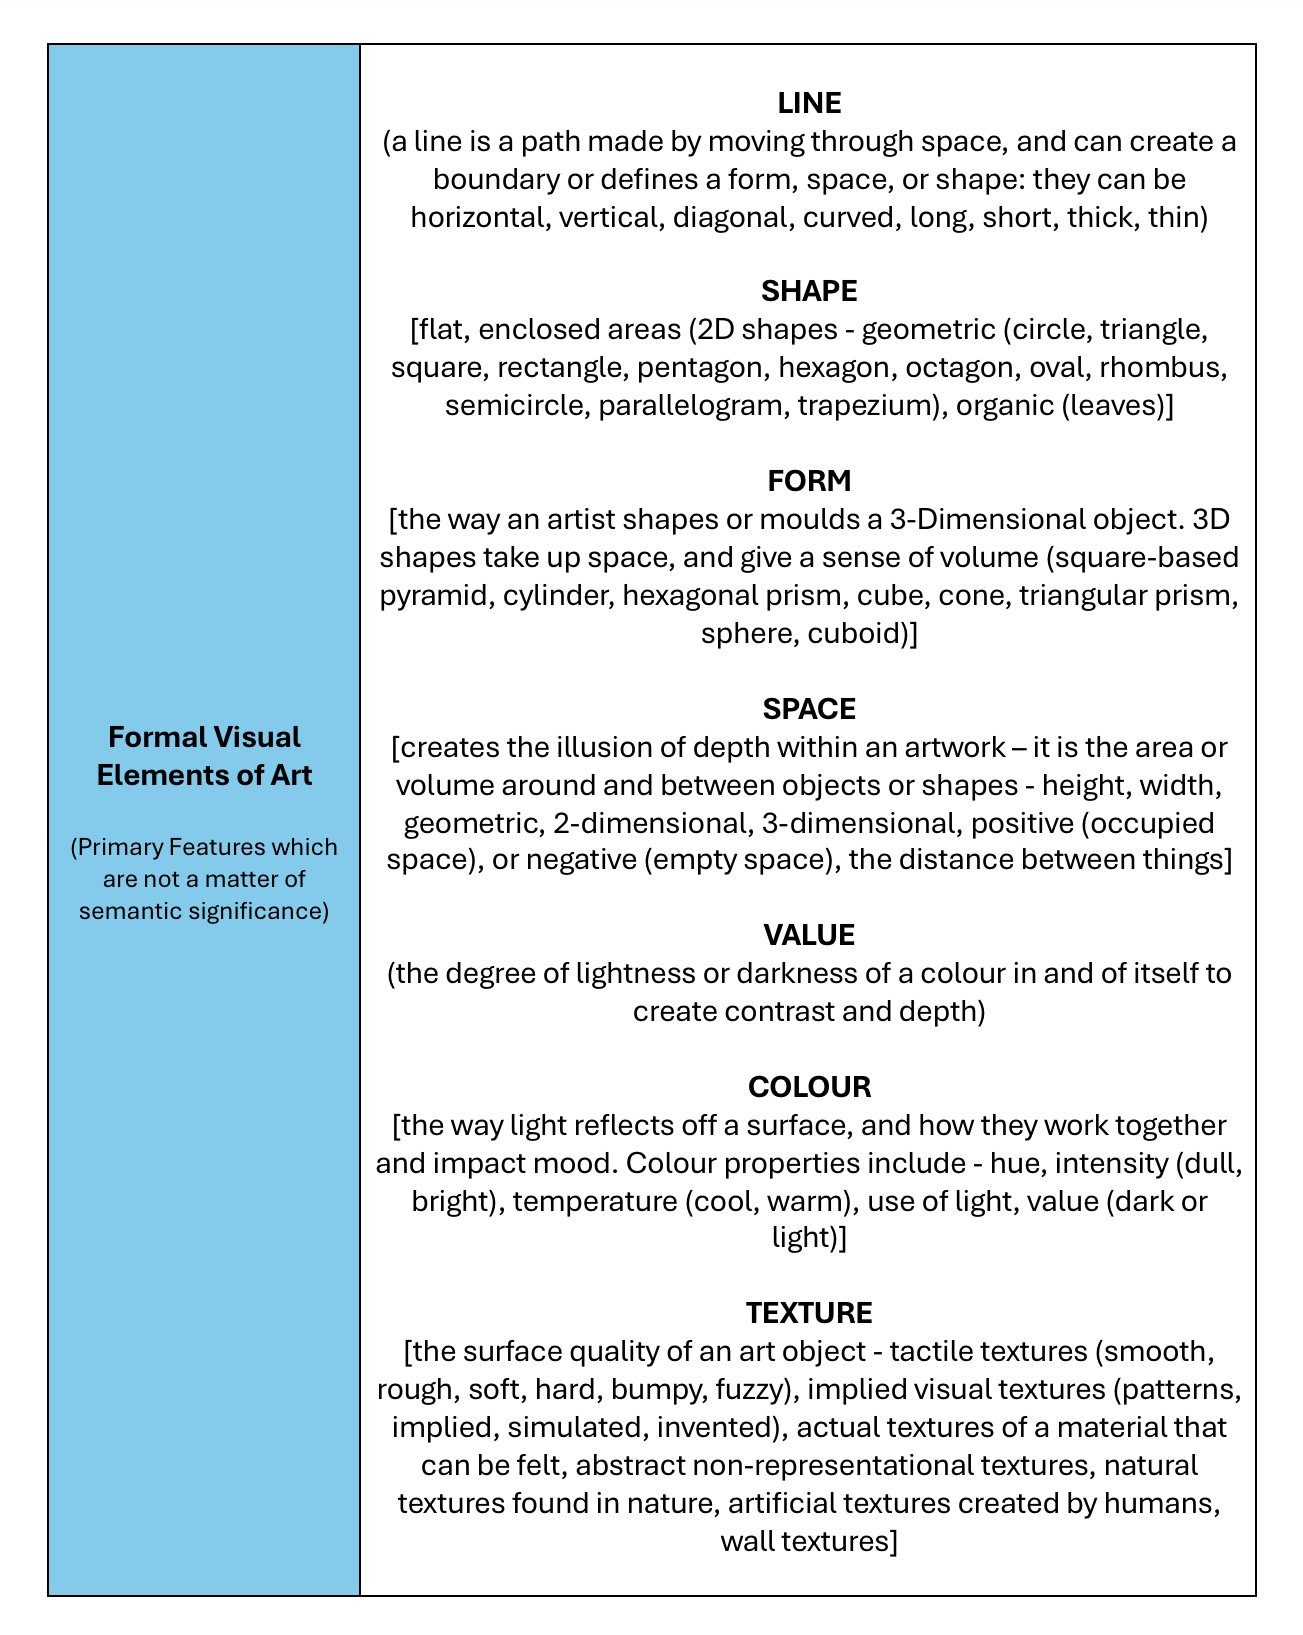
ARTIFACT 01 > Lee, Steven H. “The Formal Elements of Art.”
The Principles of Design
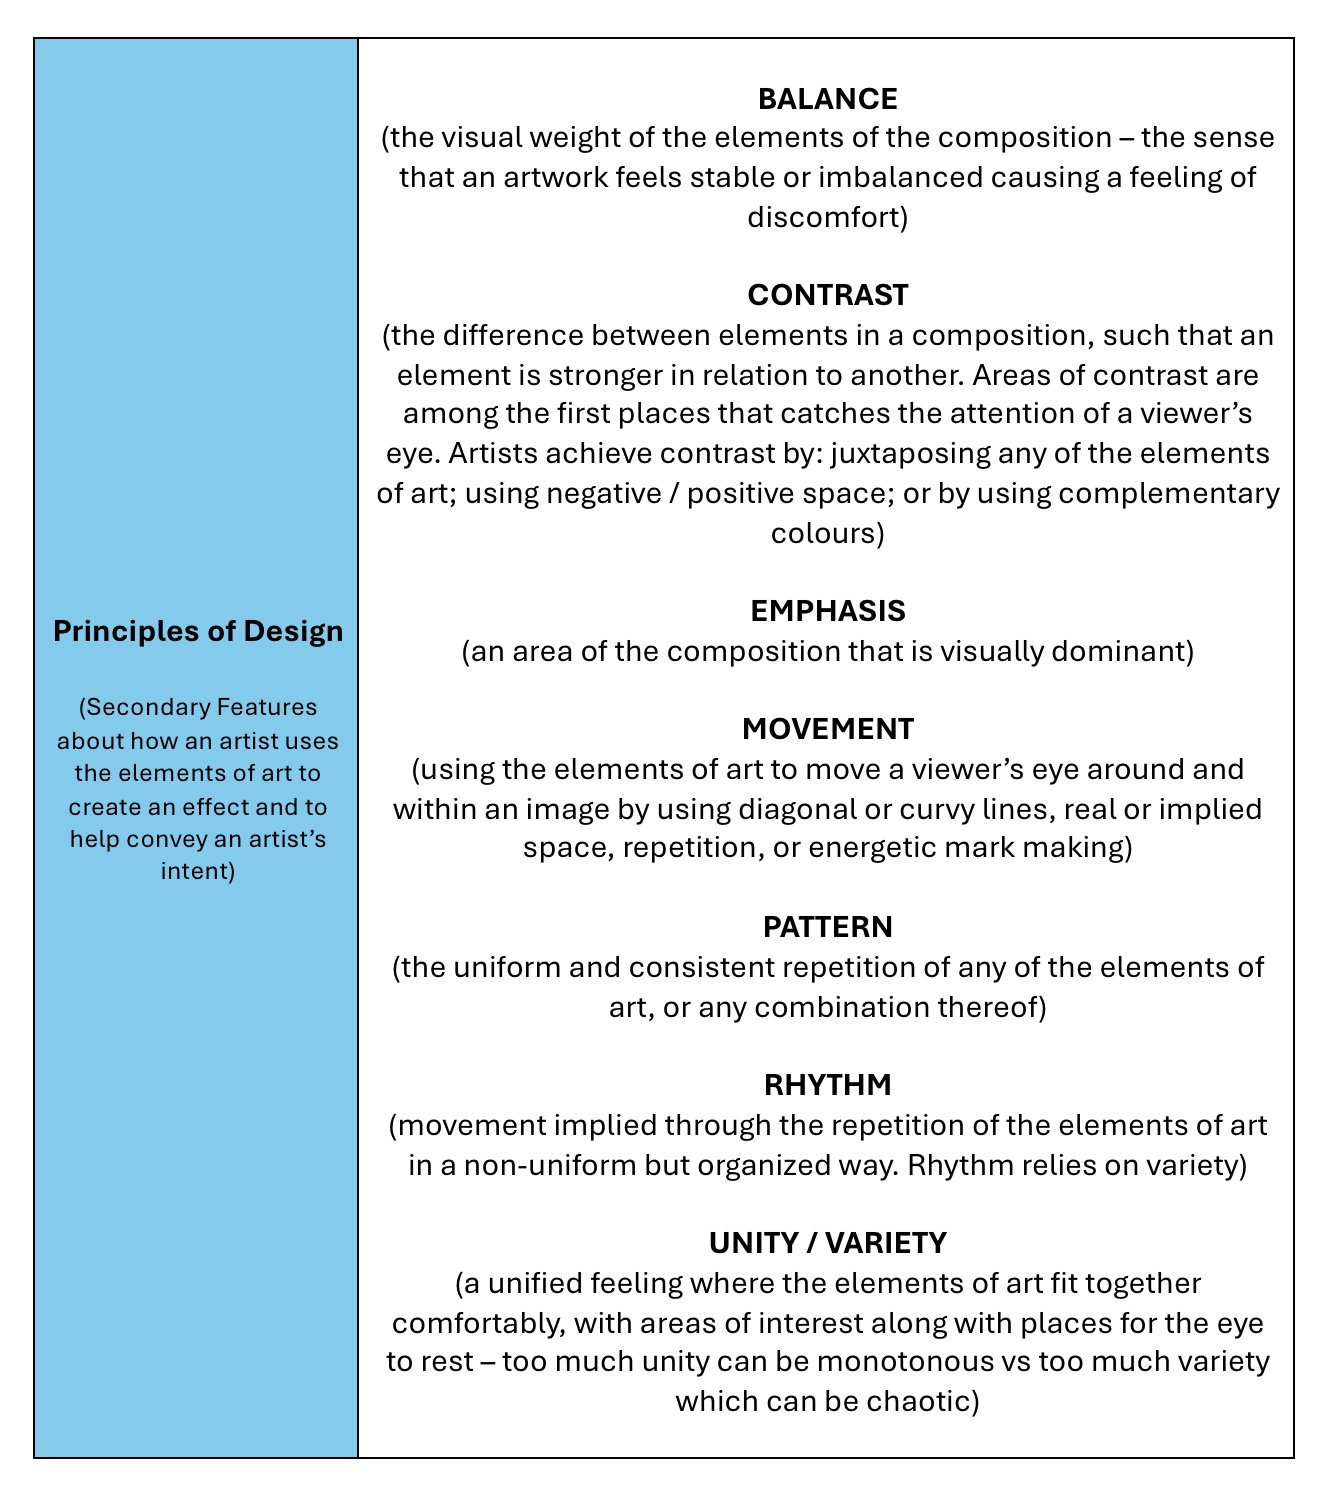
ARTIFACT 02 > Lee, Steven H. “The Principles of Design” with information from the DOMS Art League’s article, “The 7 Principles of Art & Design.”
The PHYSICAL ASPECTS of an artwork references the medium used (paint, sculpture, etc.), as well as elements such as colour, scale as well as size, texture, and the way the elements of design (line, shape, space, etc.) are arranged.
COMPOSITION refers to how the elements of art are arranged to reflect how the principles of design in a work relate to each other, and serve to create a sense of balance, rhythm, and visual interest.
Both Dr. Barenscott and Dr. Belton also discuss the division of formal elements into PRIMARY and SECONDARY features, defined as follows:
Formal elements include PRIMARY features which are not a matter of semantic significance; and
SECONDARY features focus on considering how things are arranged in the composition of the artwork. That is, they are the relation of the PRIMARY features with one another (balance, composition, contrast, dominance, harmony, movement, proportion, proximity, similarity, unity, and variety.
AP Art History and Rod Taylor’s Content, Form, and Process Mood Model puts forward a number of questions one can ask about FORM including…
HOW does it look?
HOW was it made (process / technique)?
HOW would you describe it?
HOW has the work been arranged (composition)? THAT IS - HOW are things arranged in the composition of the artwork?
HOW can we analyze the visual qualities of the artwork?
What can one say about the work in regards to the elements of art and the principles of design?
What media / materials, processes / methods, and other skills have been used in creating the artwork?
What kind of colour scheme has been used (for example, is it harmonious, or one built up of contrasts)? Does one colour predominate or do two or more have equal significance?
Is there one main overall shape, or is the artwork composed through interrelated sequences of shapes?
Are there recurring shapes, lines, rhythms, patterns, or forms which determine the design of the work?
What kinds of lines and marks does the artist use?
What kind of textures and patterns can you see?
How big or small is the work?
WHAT is the focal point of the work? Does the work together as an overall entity, or is it pleasing in parts and yet unsatisfactory as a whole?
Formal elements are the WORKING PARTS of a piece.
Dr. Barenscott reminds her readers that form DOES NOT consider the actual ‘story’ of what is being shown. This is a concern of an examination of a work’s CONTENT, which is separate and independent of FORM when analyzing any artwork in the manner outlined here.
The Tate Modern in the UK has a great PDF online where they provide advice on WAYS OF LOOKING, which includes a breakdown of questions to consider when looking at artworks, as seen in ARTIFACT 03 below…

ARTIFACT 03 > Tate Modern. “Ways of Looking: Looking at the Object - what can I see?”
Function…
Some works of art carry a functional aspect to them (ceramics pieces, for example). Some modern and contemporary works also have interactive elements that provide a functional aspect to how individuals might interact with a piece.
AP Art History notes how: “FUNCTION includes the artist’s intended use(s) of the work, which may change according to the context of the audience, time, location, and culture. Functions may be for utility, intercession, decoration, communication, and commemoration and may be spiritual, social, political, and / or personally expressive.”
Some questions to consider when examining whether or not an artwork has a function and how that function is tied to a piece’s formal aspects are as follows:
WHY was this artwork made?
What was this artwork created for?
For religious worship?
To entertain or please the eye?
To tell a story?
As a form of scientific study?
WHAT was the artwork used for?
WHAT did the artist originally intend to place the work?
WHAT is the functional purpose of this artwork? How did the original audience use this?
Process…
HOW HAS A WOPRK BEEN DEVELOPED AND MADE?
PROCESS and TECHNIQUE relates to the methods and style an artist chooses when creating a work of art.
STYLE refers to the distinctive features of the artwork that reflect the artist's personal vision, the historical period, or cultural influences.
The elements of art can also reference mark making in an artwork, as well as materiality. Size is another component of form that plays an integral part in examining an artwork.
Regina De Con Cossío, in her article The Materiality of Art explains how in art, materiality refers to the physical substances used by artists to create their works, and the way these materials impact the artwork's meaning and expression. It encompasses the choice of materials like paint, canvas, clay, metal, and fabric, and how they contribute to the overall aesthetic and conceptual message. Materiality is not just about the physical properties of the materials, but also how they interact with the artist's process and the viewer's experience.
FORM in Cinema, Music, and Sound Art…
In Cinema…
In the cinema, as well as when considering film and video art, formal elements can include:
Cinematography: the art and technology of motion-picture photography (how the film is recorded - it involves such techniques as the general composition of a scene; the lighting of the set or location; the choice of cameras, lenses, filters, and film stock; the camera angle and movements; and the integration of any special effects);
Editing: the process of assembling individual shots and scenes into a cohesive, finished movie. It involves selecting footage, arranging it in a specific order, and adding transitions to tell a story and convey the director's vision. Film editors work with raw footage, making creative and technical choices to shape the film's narrative, pace, and overall impact;
Mise-en-scène: (placing on the stage) everything that is put before the camera and seen on screen (the sets, props, costumes, actors, and even the lighting);
Narrative: the structure of a story, including the plot, characters, setting, and the way the story is told. It encompasses the sequence of events, the relationships between characters, and the overall meaning conveyed by the film. Narrative can be linear, following a chronological order, or non-linear, using techniques like flashbacks or intercutting; and
Music, Sound, and Sound Design: encompasses all audio elements, including dialogue, music, sound effects, and background noise, used to create a film's soundscape and enhance the storytelling. Sound design is the process of carefully combining these elements to evoke specific moods, emotions, and atmosphere.
In Music…
Wikipedia has a very good article describing how form is considered in relation to music, noting how: “In music, form refers to the structure of a musical composition or performance. In his book, Worlds of Music, Jeff Todd Titon suggests that a number of organizational elements may determine the formal structure of a piece of music, such as "the arrangement of musical units of sound, rhythm, melody, tempo, and/or harmony that show repetition or variation, the arrangement of the instruments (as in the order of solos in a jazz or bluegrass performance), or the way a symphonic piece is orchestrated", among other factors. It is, "the ways in which a composition is shaped to create a meaningful musical experience for the listener”.”
The Elements of Music include:
Time: Rhythm, Pulse, Meter, Tempo, Swing, Syncopation, Motive
Melody: Pitch, Interval, Scale, Contour, Character, Range, Phrasing, Motive
Texture: Monophony, Monophony with percussion, Layer, Polyphony, Heterophony, Call and response
Form: Linear, Cyclical
Harmony: Consonance, Dissonance, Harmonic Character
Timbre Tone Quality
In Sound Art…
Many of the formal elements that describe music can be applied to a consideration of artwork that uses sound. Wikipedia describes sound art as a time-based artistic practice that utilizes sound as the primary medium for creative expression, exploring sonic qualities, spaces, and experiences. Specifically, sound art can be seen as an intersection of art and sound, where sound is manipulated and presented as a work of art.
FORM Word Cloud…
The following is a word cloud that uses some of the many terms brought up in the discussion on FORM…

ARTIFACT 04 > Lee, Steven H. “Word Cloud Exploring Terms related to FORM.” 2025.
CONTENT
~
CONTENT ~
CONTENT…
LOOKING at the subject matter of an artwork. Dr. Barenscott describes CONTENT as representative of ‘WHAT’ the work is all about..
Specifically, CONTENT…
…describes the figurative meaning(s), idea(s), information, material, message(s), perspective, point(s) of view, theme(s), topic(s), subject matter, and underlying meaning(s) presented and communicated in an artwork that an artist intended to convey;
…provides the substance of communication and answers the ‘what’ or ‘subject’ of a message;
…is what a work includes or covers… it is WHAT IS CONTAINED in a work; and
…is embedded in the details: the who, what, when, where, why, and how.
VISIBLE IMAGERY as related to formal, representative, and / or symbolic depictions.
FIGURATIVE MEANINGS refer to the conventional signs and symbols in a work such as: allegories, attributes, conceptual, connotation / denotation, irony, metaphor, metonymy, parody, personifications, synecdoche, and other traditional signs.
Dr. Barenscott and Dr. Belton also breakdown CONTENT into PRIMARY and SECONDARY CONTENT as follows, where:
PRIMARY CONTENT is what you see in terms of literal images, describable facts, actions, and poses; and
SECONDARY CONTENT are the things which push “WHAT YOU SEE” into the realm of “WHAT YOU UNDERSTAND.”
It could be argued that CONTENT is evident in visual, literary, and theatre arts, whereas in music and sound art, CONTENT refers to the principal and recognizable melody of the composition.
SUBJECT > What / Who does an artwork depict?
ICONOGRAPHY > What do the figures and objects in an artwork represent?
NARRATION > What events or series of events does the artist present?
Further questions about CONTENT can include…
WHAT is it?
WHAT is it about?
WHAT is the subject matter?
WHAT is represented in the artwork>
WHAT exactly can you see in the artwork? WHAT people, places, and other things can you identify?
WHAT does the work represent?
WHAT does the artist call the work? WHY?
Does the title change the way we see the work?
WHAT is the overall theme, major idea, or message of the work?
The Tate Modern in the UK has a great PDF online where they provide advice on WAYS OF LOOKING, which includes a consideration of how to figure out what the subject of an artwork is all about…
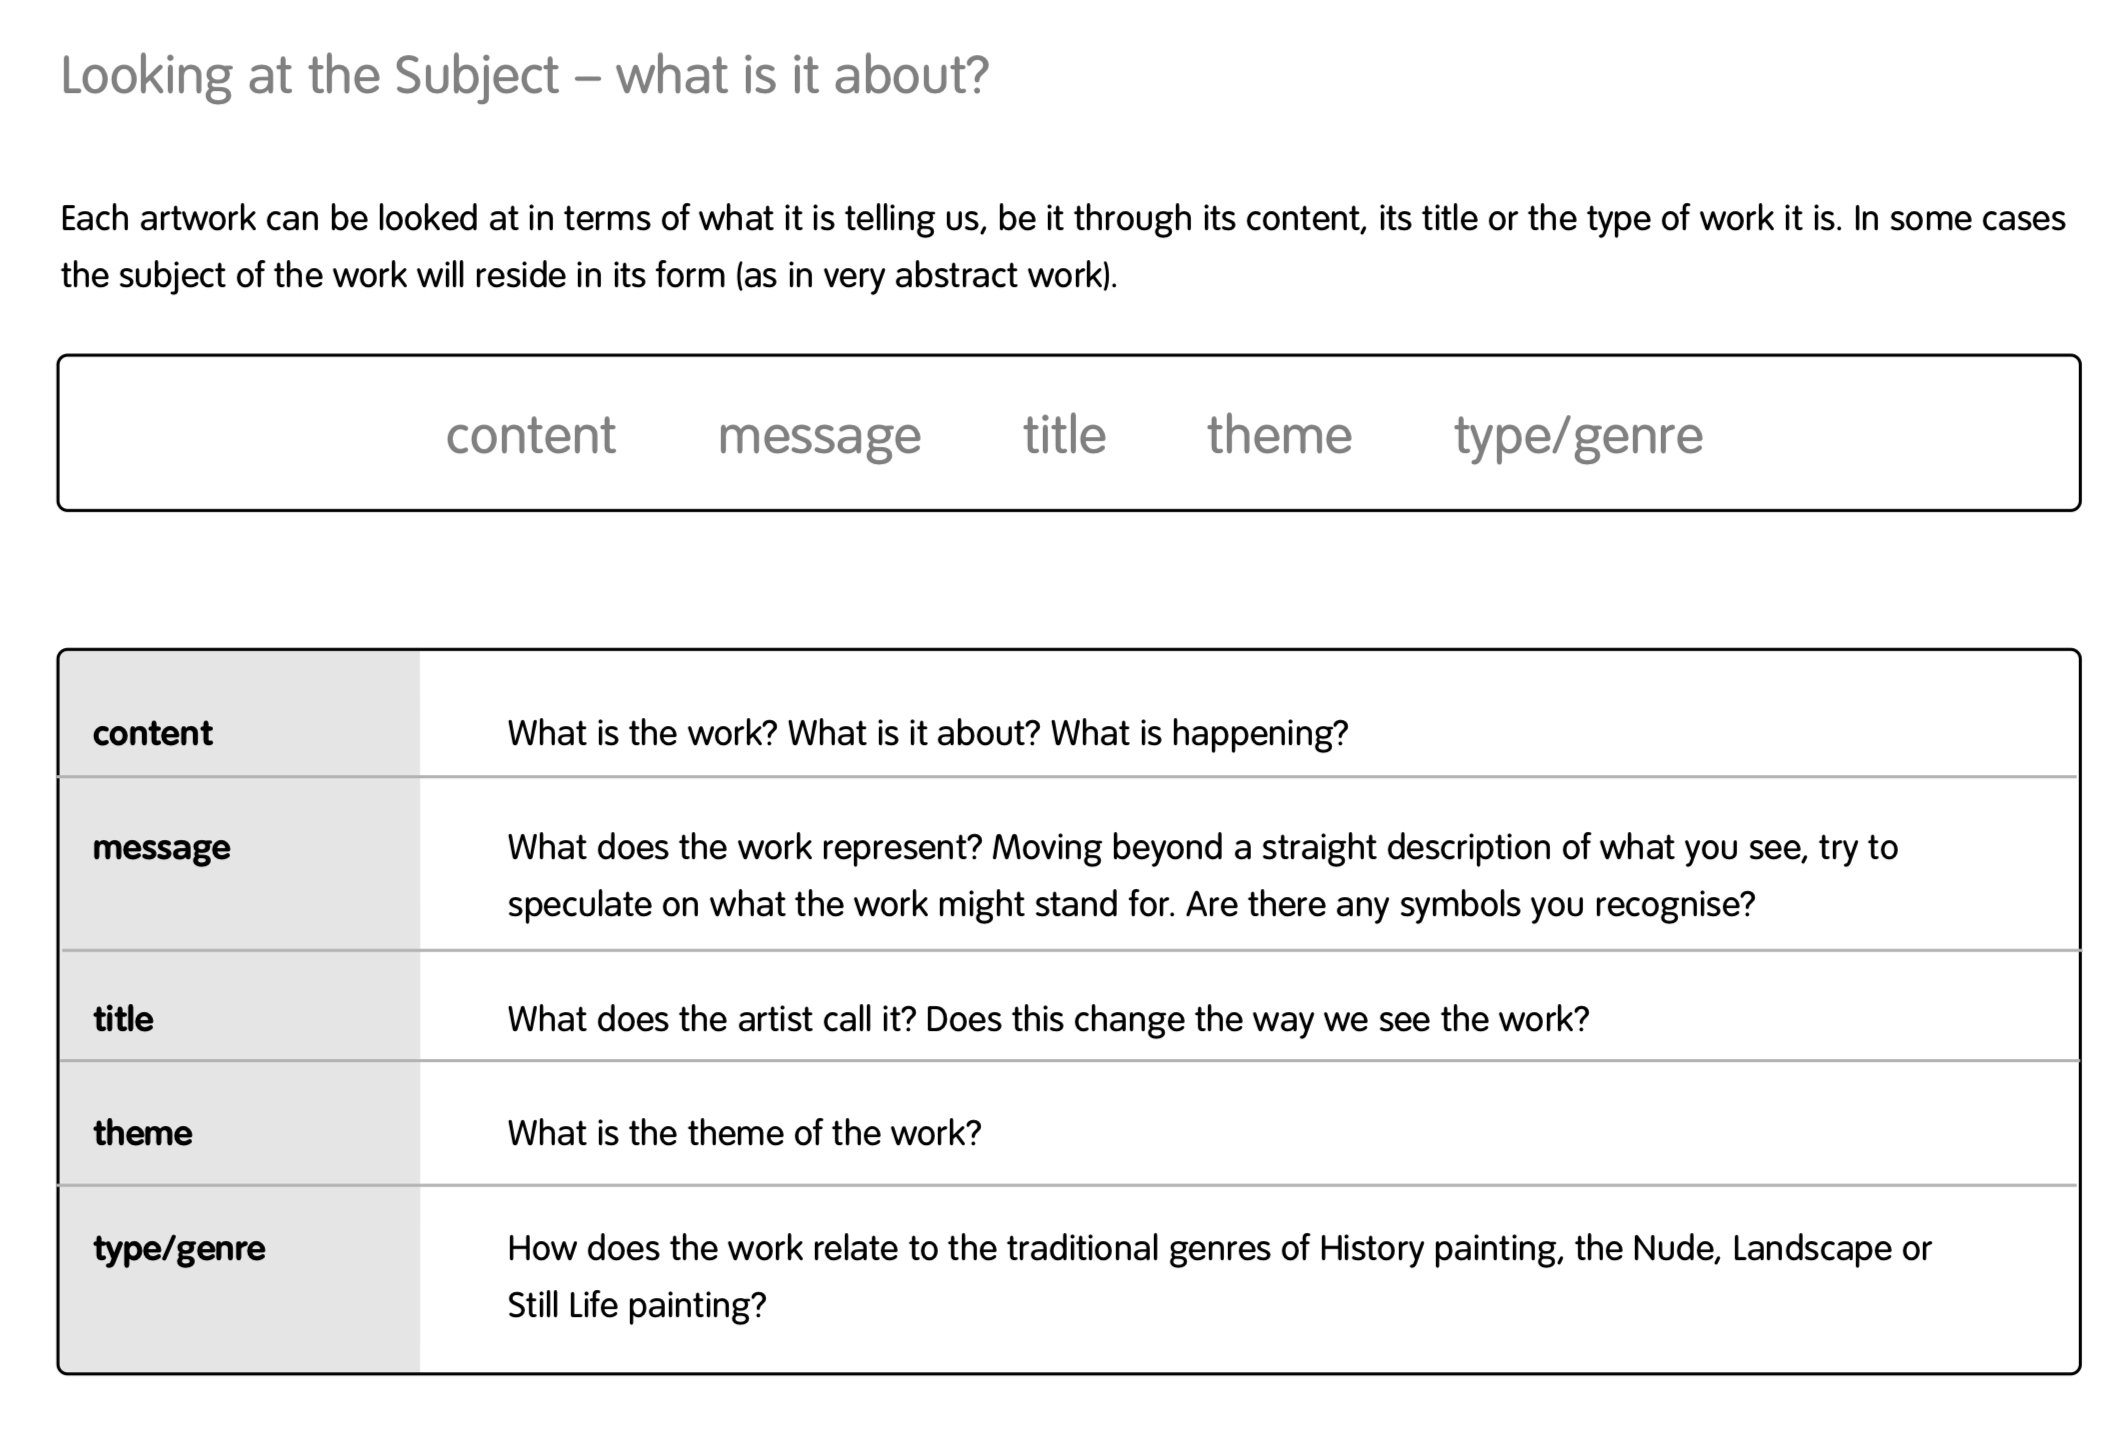
ARTIFACT 05 > Tate Modern. “Ways of Looking: Looking at the Subject - what is it about?”
Dr Ruth Riechert in her June 2017 article for Medium, “What does ‘genre’ in Art mean? Things you never dared to ask a gallerist” describes how: “The term genre has two meanings: on the one hand, it means the trope or category of a painting; on the other hand, it denotes the content or topic of a particular picture.”
Dr. Riechert also discusses the following ARTWORK classifications as established during the Renaissance, where man was the measure of all things:
historical;
portraiture;
genre painting;
landscapes;
animal painting; and
still-life.
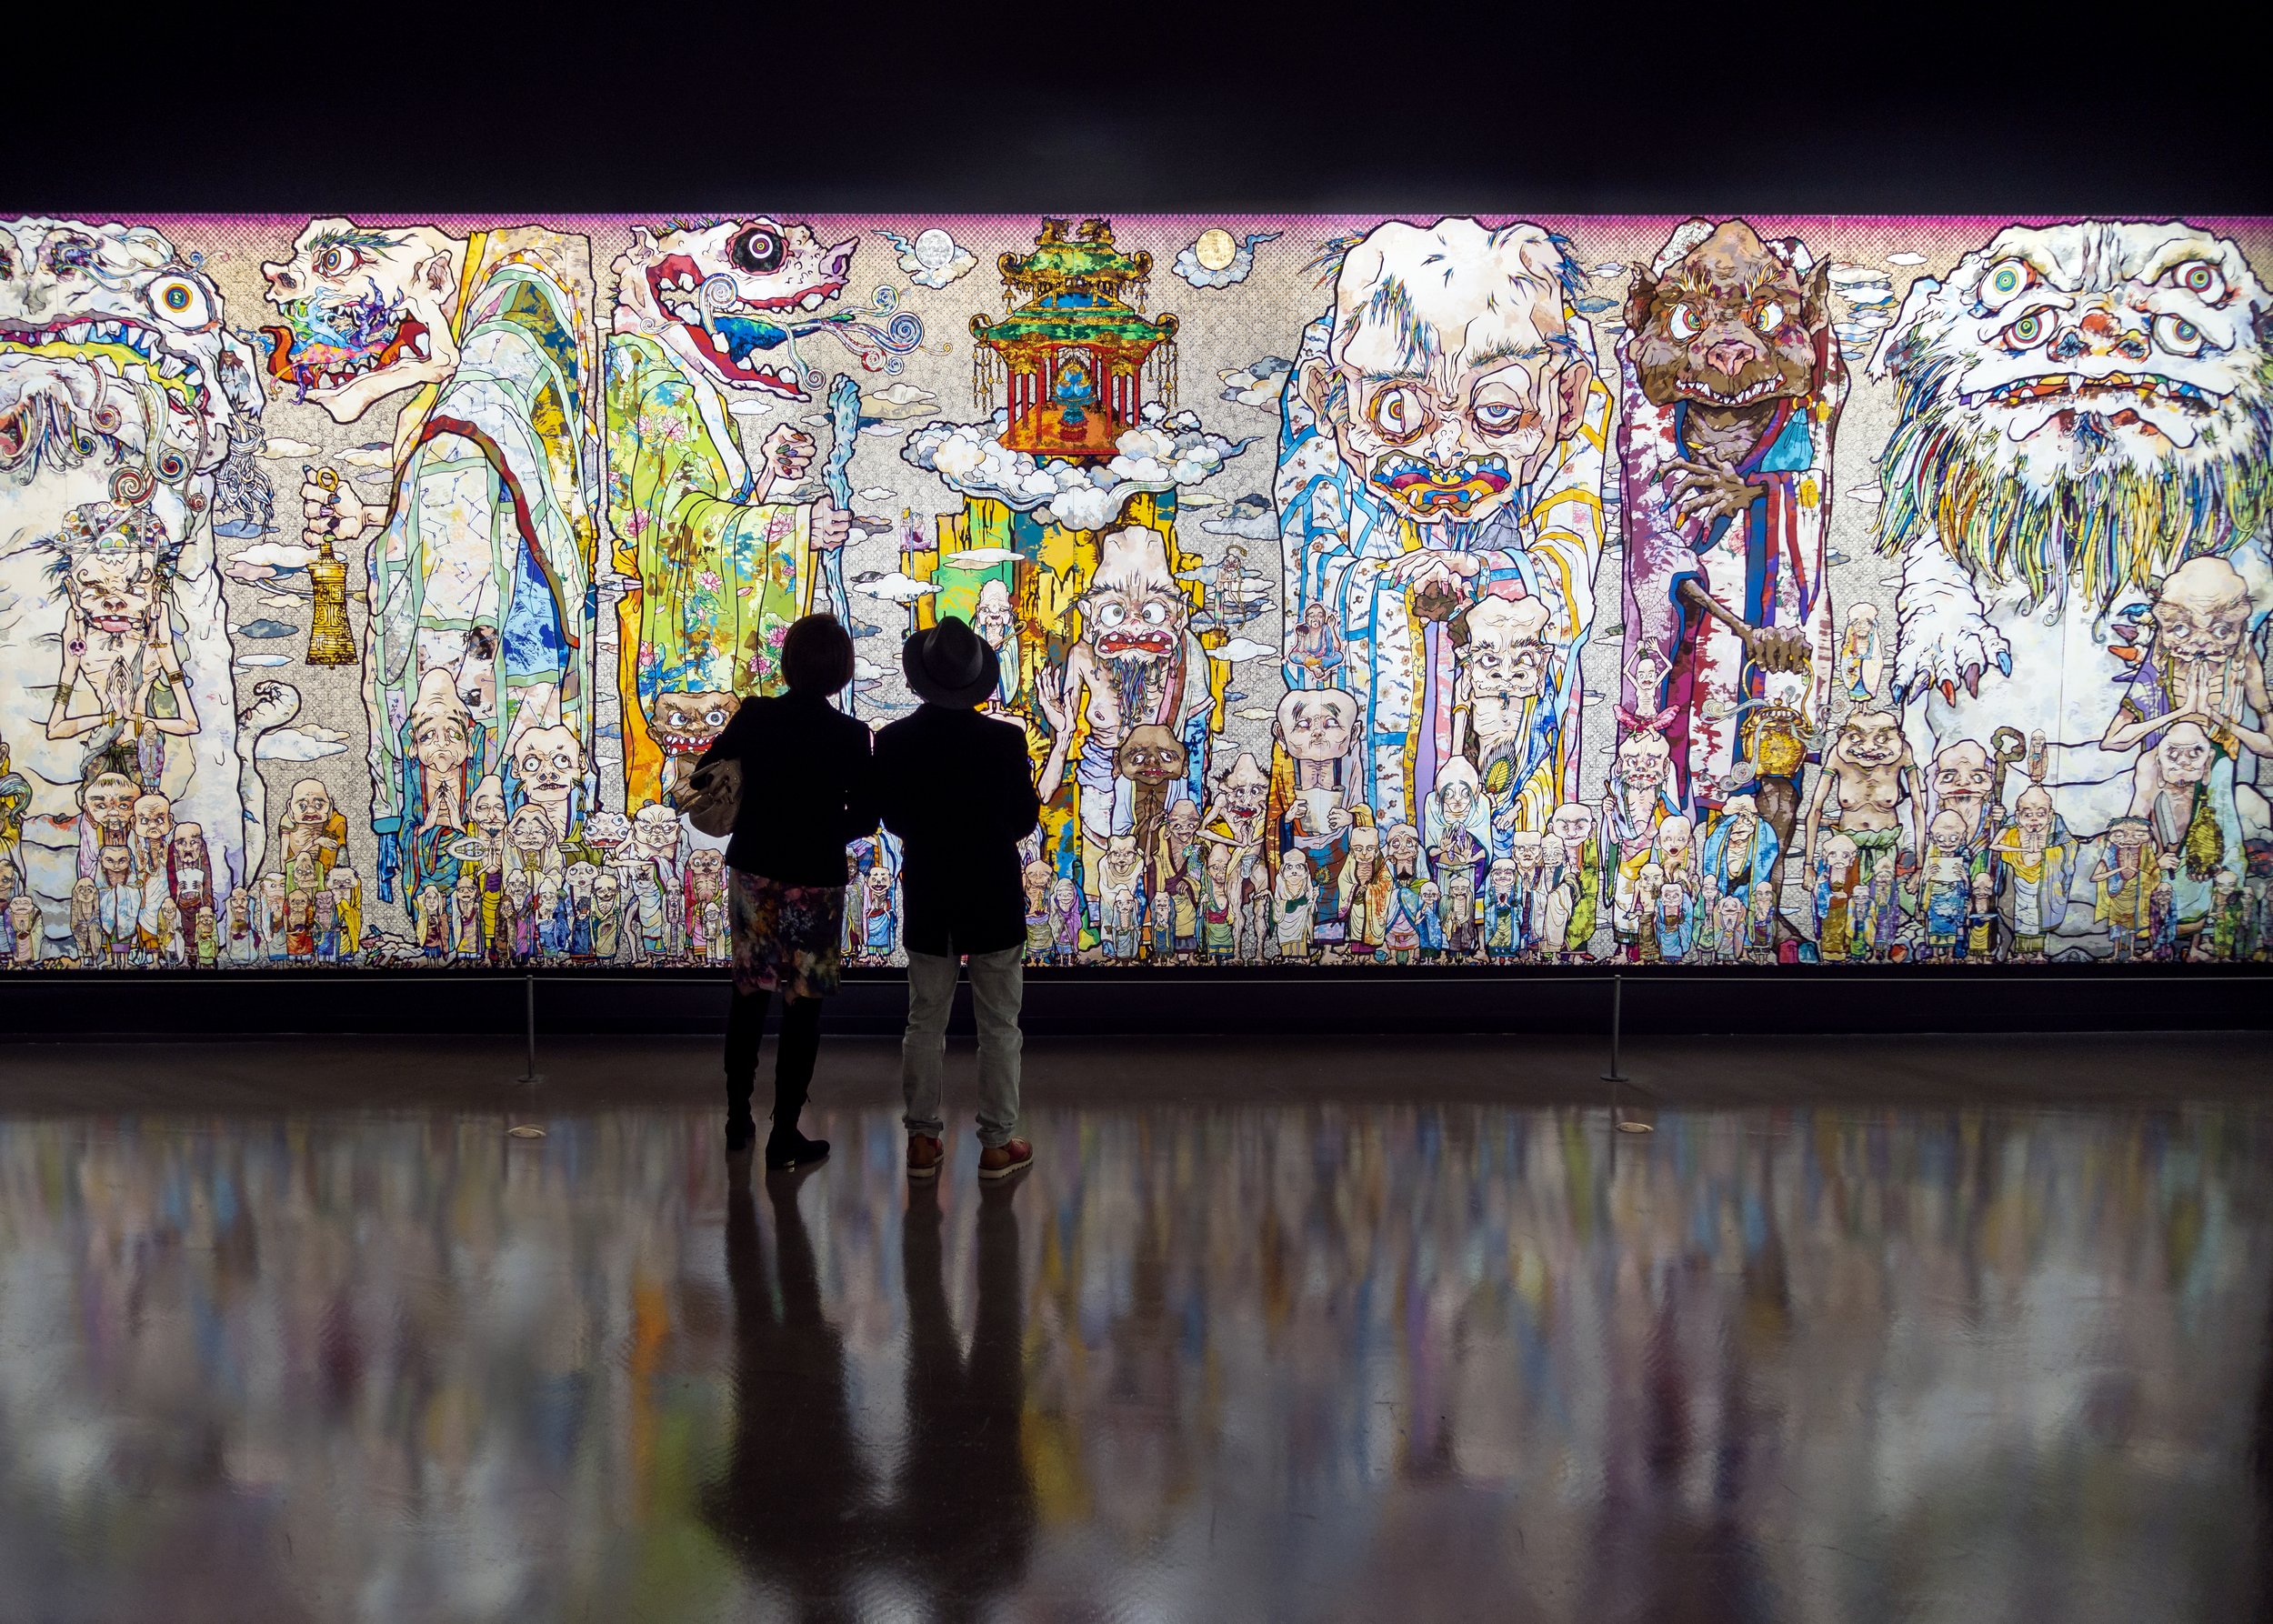
ARTIFACT 06 > Lee, Steven H. “69 Arhats… (3/5).” Flickr, 02 Feb 2018.
Mood…
The Tate Modern in the UK has a great PDF online where they provide advice on WAYS OF LOOKING, starting with a personal approach focussed on what a viewer brings to the table when examining works of art…

ARTIFACT 07 > Tate Modern. “Ways of Looking: A Personal Approach - what do I bring?”
Looking at the communication of moods and feelings.
Many teachers encourage their students as well as viewers of art to consider how a work of art impacts them in terms of mood - on an emotional level. Some sites and charts I’ve seen online even break this component out as being separate from FORM, CONTENT, and CONTEXT. Ultimately though, this idea is about looking at the communication of mood and feelings in a work of art. This can be done by considering some of the following ideas and questions:
Does the artwork affect you, the viewer, in any way? How does the work make you feel?
Why do you feel like this?
Is your mood simply one of the moment or has the artwork in question directly affected you?
Does it capture a mood, feeling, or emotion which you have already experienced?
How do the formal elements (colour, texture, shape, etc) in the artwork affect your mood?
How does the content and theme of the work affect your mood?
Does it convey feelings about life and nature?
Can you imagine what the artist’s feelings might have been like while producing the work?
Is the work…
…reflective, thoughtful, or contemplative…
…quiet, or noisy…
…soothing, or disturbing…
…happy, elated, celebratory, or sad…
…relaxed, peaceful, hopeful, or jarring…
…in the mood which it conveys and the feelings it arouses?
CONTENT in Cinema, Music, and Sound Art…
In Cinema…
In cinema and video art, CONTENT explores what the film or video art is about, its SUBJECT, and what themes are explored in the piece.
Questions related to CONTENT in film and video art include:
WHO are the film’s characters and WHAT is their story about?
What does the audience see?
Where does the film take place?
What is the film or video art about? That is, what themes and ideas are present?
CONTENT’s Relationship to FORM…
FORM can and does influence how CONTENT is perceived and understood.
Statements made concerning CONENT are backed up by the elements of art and the principles of design that an artist has utilized in a work of art.
ARE THE FORMAL ELEMENTS of an artwork’s form in keeping with the content? Does the form contradict or affirm the work’s ‘message’?
CONTENT Word Cloud…
The following word cloud reflects back on some of the words used in the discussion of CONTENT…

ARTIFACT 08 > Lee, Steven H. “Word Cloud Exploring Terms Related to CONTENT.” 2025.
CONTEXT
~
CONTEXT ~
CONTEXT…
Looking at the deeper meanings that impacted the creation of a artwork.
Finally, Dr Barenscott describes CONTEXT as being representative of ‘IN WHAT CIRCUMSTANCES’ the work is (and was) produced.
Specifically, CONTEXT…
…references the varied circumstances (events, timing, background, and environment) surrounding the work’s creation and interpretation, such as historical, social, or personal factors;
…relates to the background or situation(s) that help viewers understand a work better.
CONTEXT asks WHY by examining the intention and purpose behind a work. CONTEXT can also reference the parts of a discourse that surround a work which shed light on its meaning.
The Tate Modern in the UK has a great PDF online where they provide advice on WAYS OF LOOKING, ending with a consideration of how one can relate works of art to the outside world when examining works of art…
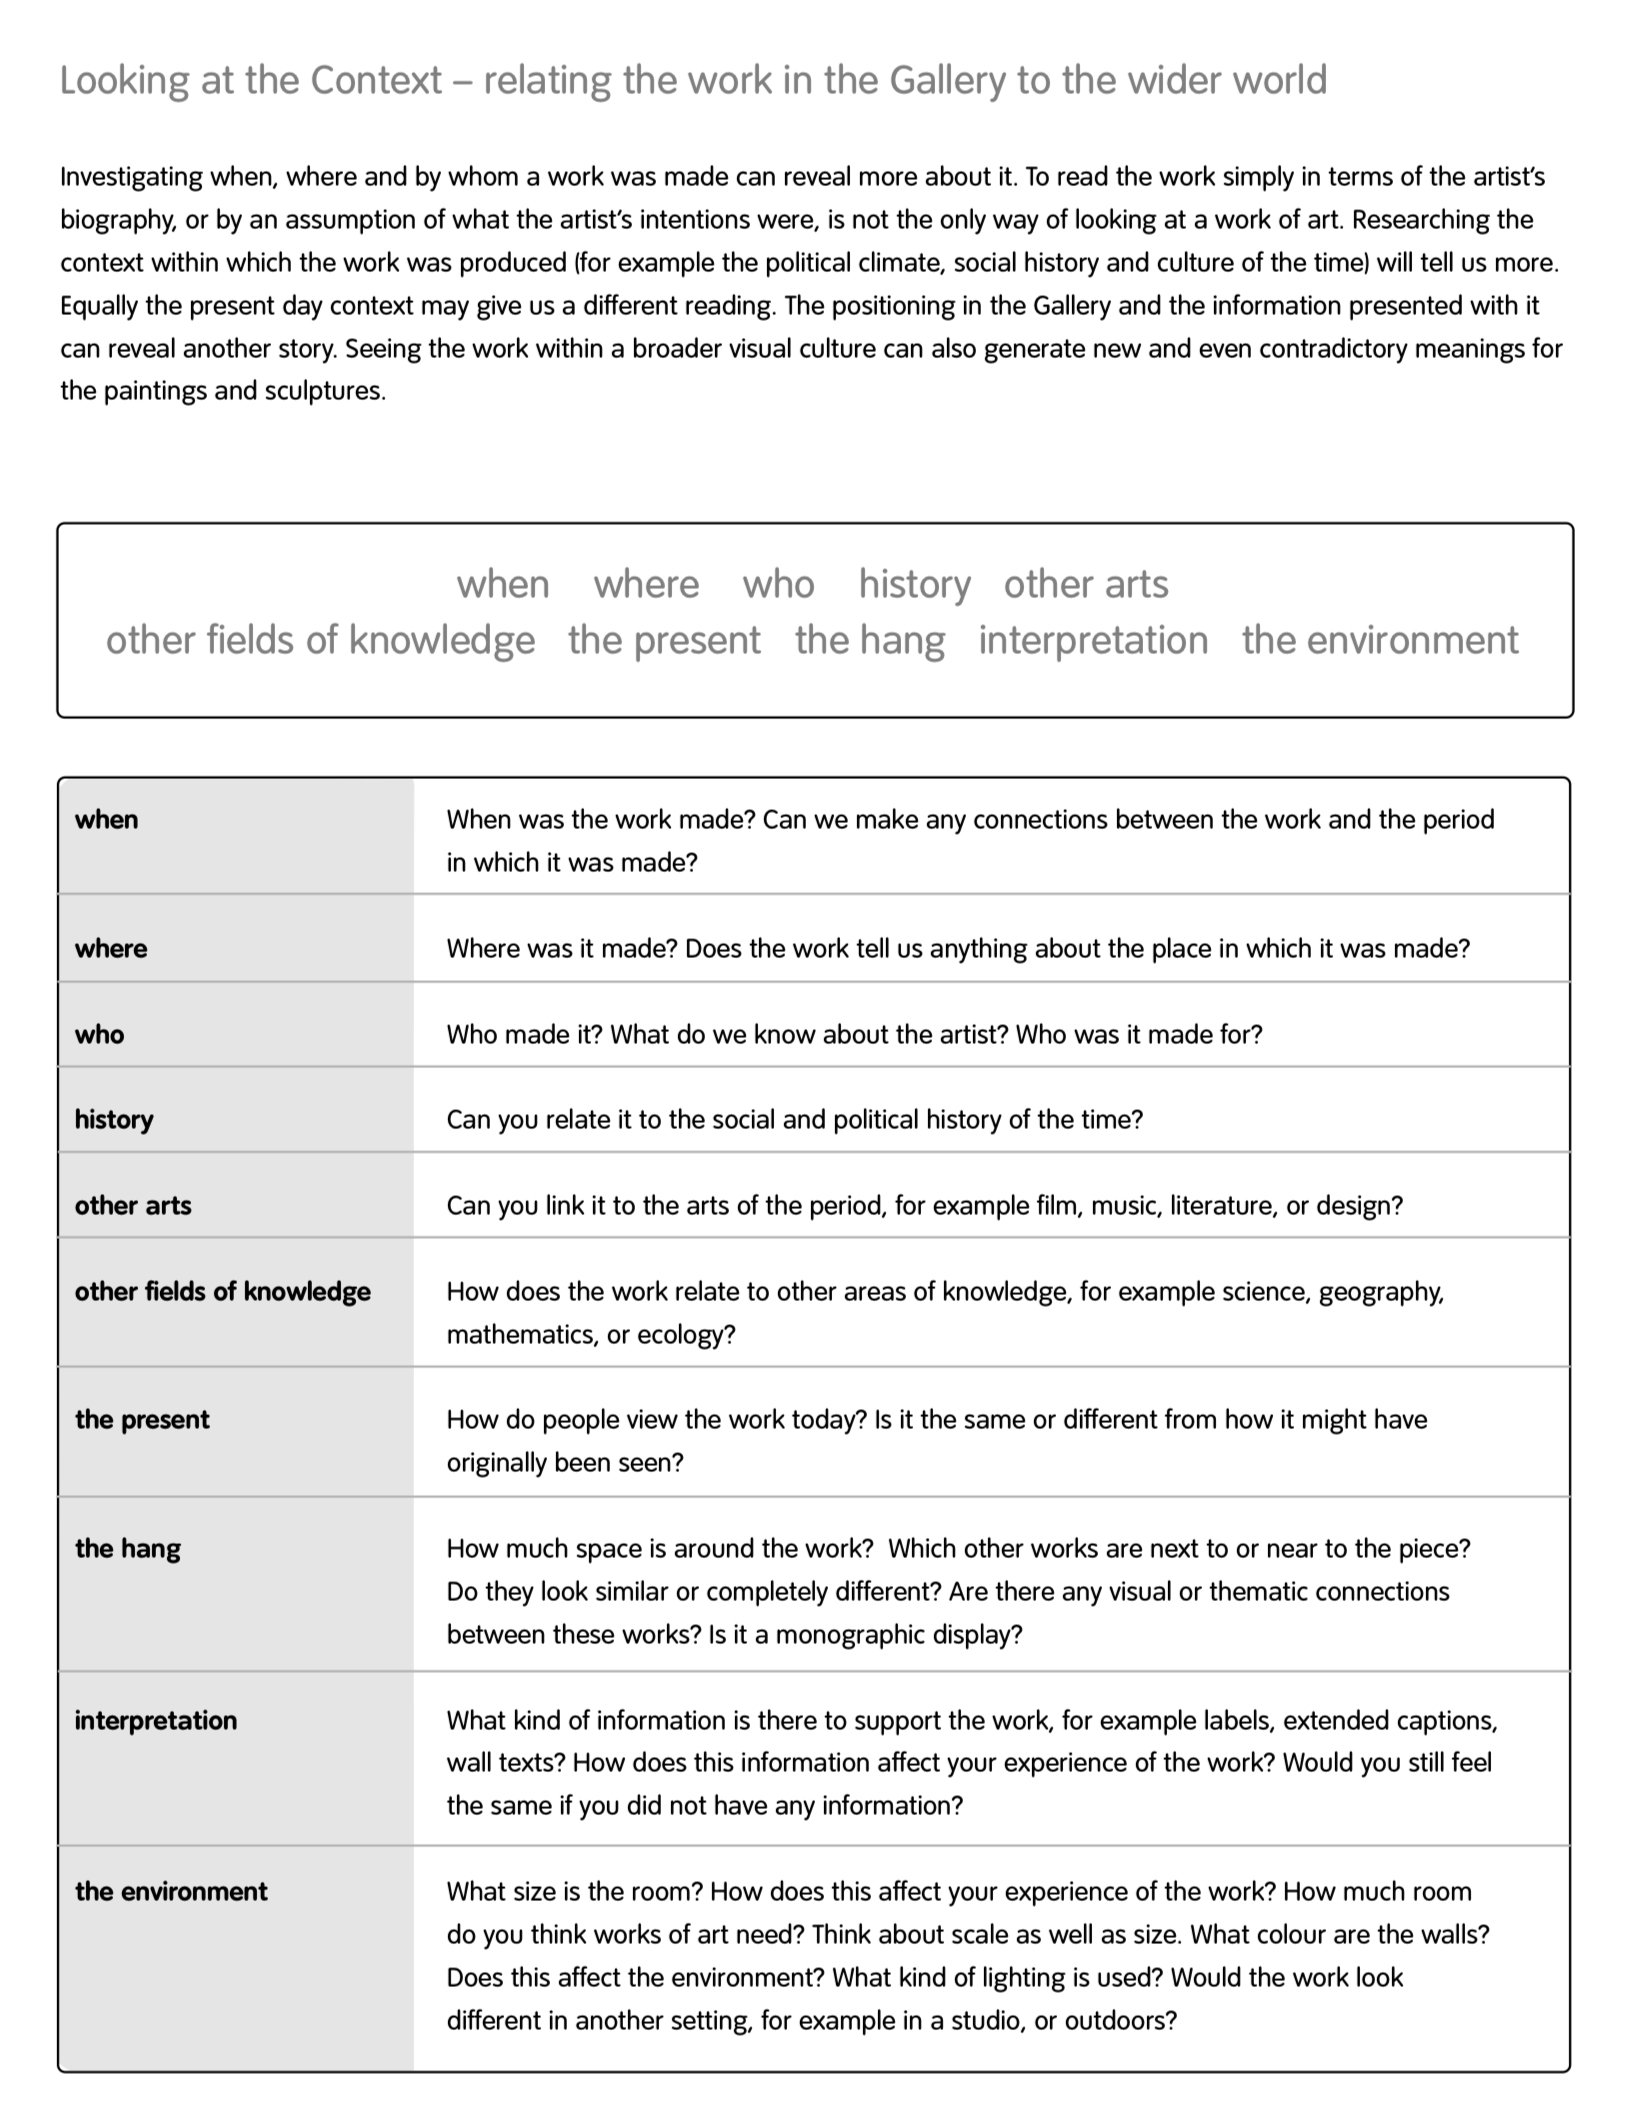
ARTIFACT 09 > Tate Modern. “Looking at the Context - relating the work in the Gallery to the wider world.”
CONTEXT is all about the historical time period in which a work was created… as well as the cultural, social and political climate at the time an artwork was made.
CONTEXT can also include an understanding of the artist’s personal beliefs and values.
Dr. Barenscott and Dr. Belton also breakdown context into PRIMARY and SECONDARY context as follows…
PRIMARY CONTEXT is everything that pertains to the artist: their attitudes, beliefs, biography, education, interests, training, and values; and
SECONDARY CONTEXT addresses the original and subsequent historical and cultural milieu in which the work was produced… including the apparent function of the work at hand, religious and philosophical convictions, sociopolitical and economic structures, and even the climate and geography where relevant.
Some questions to consider when it comes to an exploration of the CONTEXT in which an artwork exists includes…
WHAT background information is there about the original creation of this artwork? WHEN was the artwork created?
WHO made this? WHAT is known about this artist? What is / was the artist’s status in their culture?
WHAT are the beliefs of the people who made this?
WHO was the original audience? How was the artwork interpreted by the audience? What was the audience’s response to the work of art? Characteristics of the artist and audience include…
Artistic;
Aesthetic;
Cultural;
Economic;
Educational;
Intellectual;
Personal;
Philosophical;
Political;
Religious and Spiritual (which can relate to paraphernalia such as ceremonial objects and attire); as well as
Social.
WHAT is the provenance of an artwork? That is, what are the history behind the patronage and ownership of a work of art, as well as any other power relationships?
WHERE was it originally displayed or experienced (when, where, and how audiences interact with the work)? Was the chosen site publicly or privately accessible?
WHAT kind of impact did the artwork have? Did it inspire or influence other artists? Was it seen by a large number of people? Were there any controversies surrounding the artwork? Did the artwork alter or influence the fashion or taste of its time?
WHAT other factors influenced the creation of this artwork?
SOURCES of contextual information may be provided by… academic publications, archives, archeology, biographies, criminological data, cultural studies, geographic data, manifestos, mass media, memoirs, narratives, nonfiction writing, performance (dance, dramatic productions, music, oral, or written), personal reflections, records, research (primary and secondary), religious chronicles, reports, and sociological data.
CONTEXT in Cinema, Music, and Sound Art…
In Cinema…
In the CINEMA, CONTEXT references a film or video art’s relationship and reflection on society including…
…conflicts, contradictions, historical problems, issues, and societal concerns;
…thematic focuses;
…the time period when a production is produced;
…the era the film or video art is set in and explores; as well as
…the technologies that were available and used during the making of the film or video art.
CONTEXT in film can include a consideration of an AUTEUR’S BELIEFS - that is, what the author of the text believes in.
CONTEXT in cinema and video art can also include the VIEWER’S BELIEFS - that is, how audiences interpreted a film or video artwork. It’s important to remember that every individual can bring different experiences, beliefs, and understandings to their interpretation of a film or piece of video art.
In Sound Art…
In sound art, context refers to the environment, both physical and cultural, in which a sound work is experienced. This context can significantly influence how a sound work is perceived and interpreted. Sound art often incorporates environmental sounds, site-specific elements, and even audience interaction to create a unique and contextualized listening experience.
Here's a more detailed look at the role of context in sound art:
Site-Specificity: Many sound installations are designed for a specific location, taking into account the acoustics, architecture, and even the historical or cultural significance of the space. The context of the site shapes the sound work, and the sound work in turn interacts with and transforms the site.
Audience Interaction: Sound art can be participatory, involving audience members in the creation or modification of the soundscape. This interaction adds another layer of context, as the audience's presence and engagement become part of the artwork.
Environmental Sounds: Sound artists often incorporate ambient sounds from the environment into their works, creating a rich tapestry of sonic textures. These sounds can be manipulated, transformed, and even integrated into the overall composition to create a sense of place and context.
Cultural and Historical Context:Sound art can also reflect the broader cultural and historical context in which it is created and experienced. Artists may draw inspiration from traditional music, field recordings, or even everyday sounds, using them to explore social, political, or personal themes.
Silence: In sound art, silence can be a powerful element, just as much as sound itself. The context of silence can create a sense of anticipation, tension, or even contemplation, adding another layer of meaning to the sound work.
In essence, the context of a sound work is not just a backdrop; it's an integral part of the artwork itself. By considering the site, audience interaction, environmental sounds, cultural influences, and silence, sound artists can create works that are both aesthetically compelling and deeply meaningful.
PUTTING IT ALL TOGETHER…
CONTEXT can provide further meaning to both the form and the content of an artwork. It provides the FRAMEWORK that helps to interpret / understand the meaning of the work’s content… for example, understanding the historical context of a painting can help interpret its meaning and message. Furthermore, understanding an artist’s personal context can shed light on their formal artistic choices.
CONTEXT references DETAILS that help to explain a work’s meaning.
CONTEXT leans into the intentions or the “…what do I want you to think or feel about the details provided by the content: the who, what, when, where, why, and how.”
Always be prepared to provide for all contextual, or content evidence that reflects or contributes to the function of an artwork. Some questions related to exploring this include…
What about how this artwork looks can be used as evidence of its form and function?
How does anything else you know (but can’t see) relate to its function?
One might also be asked to provide details from an artwork’s form and content to explain what you know about the contextual information about the person / people / culture that created an artwork, or their beliefs and practices. Questions related to exploring this include…
What do you see that provides evidence of the contextual of its creation?
What about how this artwork looks provides insight into the context surrounding its creation?
ULTIMATELY, any claims you make about an artwork should be backed up by what you see in the work of art itself.
It is important to remember that the elements of FORM, CONTENT, AND CONTEXT are not mutually exclusive - they all contribute to how an artwork is created and understood.
CONTEXT Word Cloud…
The following word cloud reflects back on some of the terminology used in the discussion of CONTEXT…

WORKS CITED…
Barenscott, Dorothy. “Focus on Fundamentals of Visual Art and Culture: CONTENT.” Avant-Guardian Mussings, 19 Jan 2016.
Barenscott, Dorothy. “Focus on Fundamentals of Visual Art and Culture: CONTEXT.”
Barenscott, Dorothy. “Focus on Fundamentals of Visual Art and Culture: FORM.” Avant-Guardian Mussings. 14 Jan 2016.
Barenscott, Dorothy. “Focus on Research | The Elements of Art: Form, Content, and Context.” Avant-Guardian Mussings. 13 Oct 2010.
DOMS India. “The 7 Principles of Art and Design.” 2023.
Lee, Steven H. “Online Journal for MAKING SENSE OF ART HISTORY.” OpenLearn, 2023.
The Tate Museum. “Ways of Looking PDF.”
Unknown Author. “AP Art History: Form, Content, Function, and Context.”
HEADER IMAGE > Lee, Steven H. “Paint Box.” Flickr, 20 Jan 2010.