Course 01, Week 04: PICTURE DECISIONS - VANTAGE POINT & THE FRAME

In Module Four we will turn to concepts related to the way photographs look, and how practical decisions that are unique to photography can have dramatic effect in terms of what their creative content might be. We examine the aspects of Vantage Point and Frame as essential choices that must be made by photographers no matter what their ultimate goal for image-making. We also introduce the Peer Review process for paid-Learners, and the ways we can learn about our own ideas through using "terms of art" in written reviews the photographs of fellow Learners.

Assignment - Your World Transformed by the Frame

Transform a scene that is an ordinary, everyday, part of your life experience to create a new and exciting interpretation from one or more of the following effects of the FRAME:

  • a new content resulting from unexpected connections between two or more things that are isolated from the space around them and now related because they are enclosed by the Frame;

  • a change in the normal meaning of some thing or some person because that element is abruptly cut by the edge of the Frame in an unusual manner;

  • a compositional balance (such as symmetry or asymmetry) or design element (such as pattern or negative space) that is emphasized because of the Frame;

  • a change in content emphasis in the scene that results from using a Vertical Frame rather than a Horizontal Frame, or vice versa.

Choose an ISO that is appropriate for the light level so that you can use a shutter speed of at least 1/60 second to avoid motion blur.

Use "Program" exposure. You may set your camera to create a RAW and JPEG FILE, but please upload photographs for this and all future assignments in JPEG FORMAT ONLY, please no TIFF, PDF, or others!

First make a photograph of the general scene from your "normal" height vantage point. Use a wide angle lens (a short focal length) if you have one, to make a general documentary photograph of the place that does not create an emphasis on the framing but simply shows the scene.

Next make a series of photographs using any focal length lens you like, in which you create a new content through use of the Frame that create unexpected and even surprising new connections, relationships, and alterations, from the "ordinary."

Upload two image files just as the camera recorded them, without any Photoshop or App manipulation:

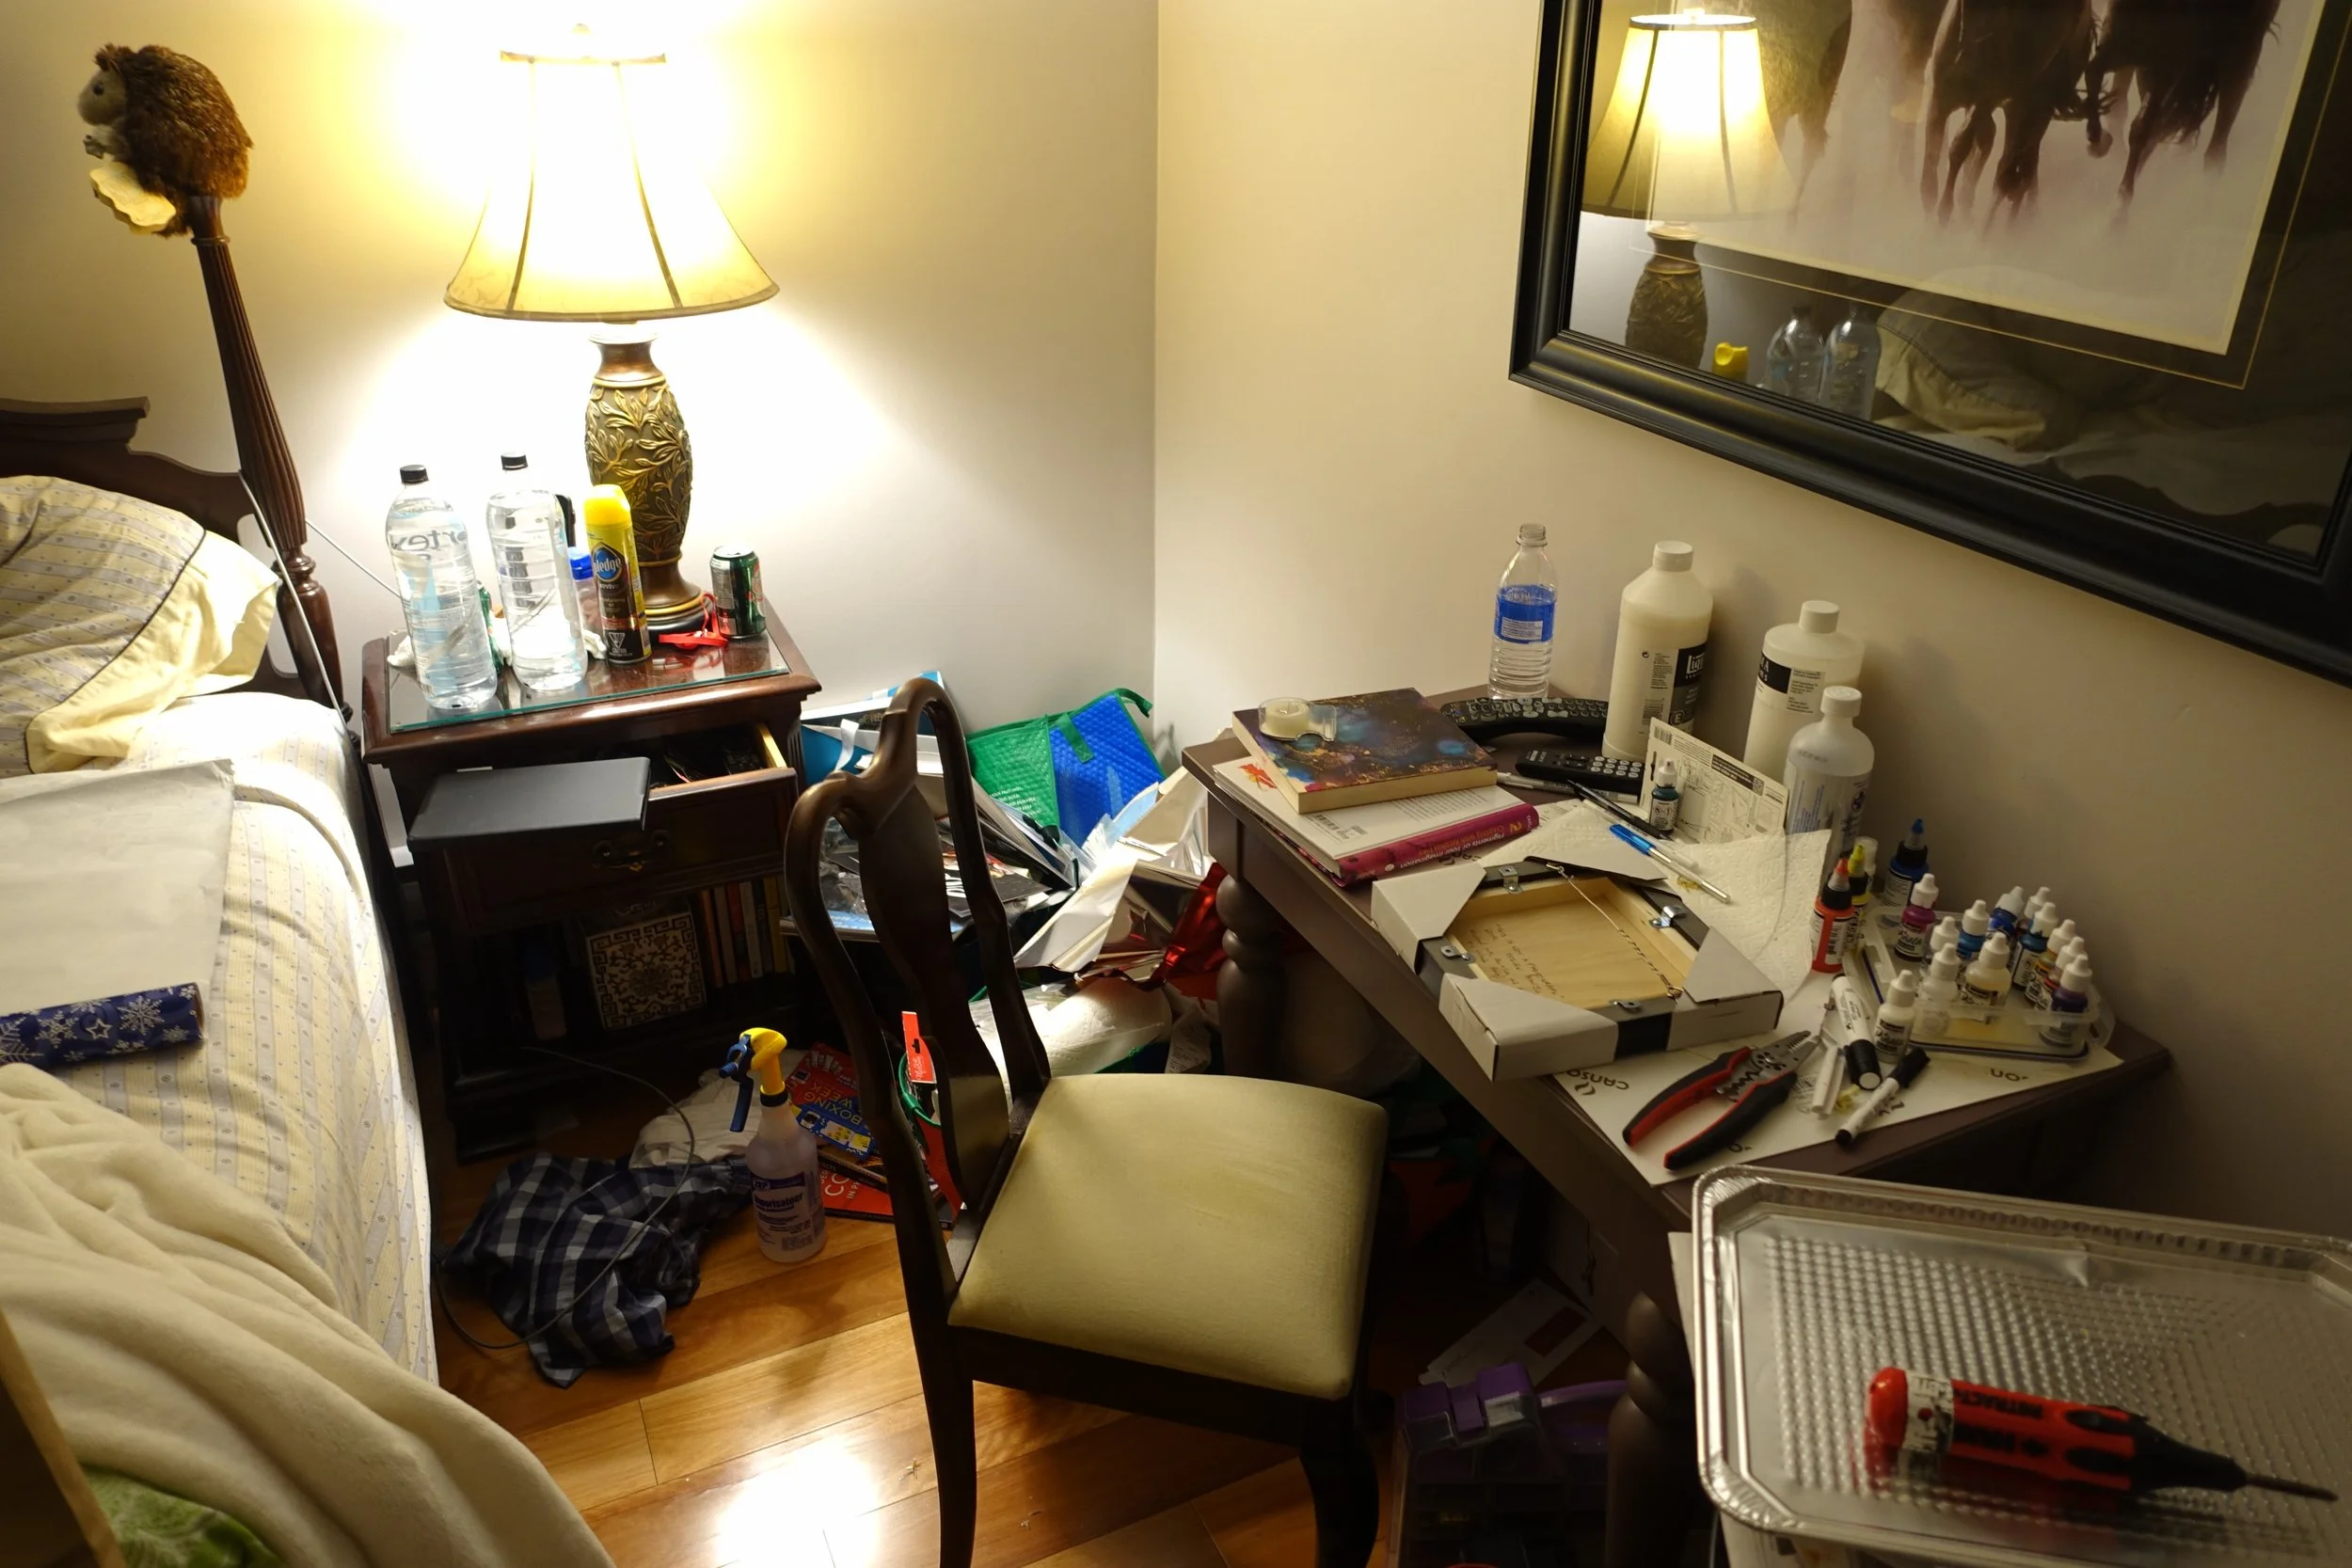
  • the first a simple view of the general scene, titled "SCENE";

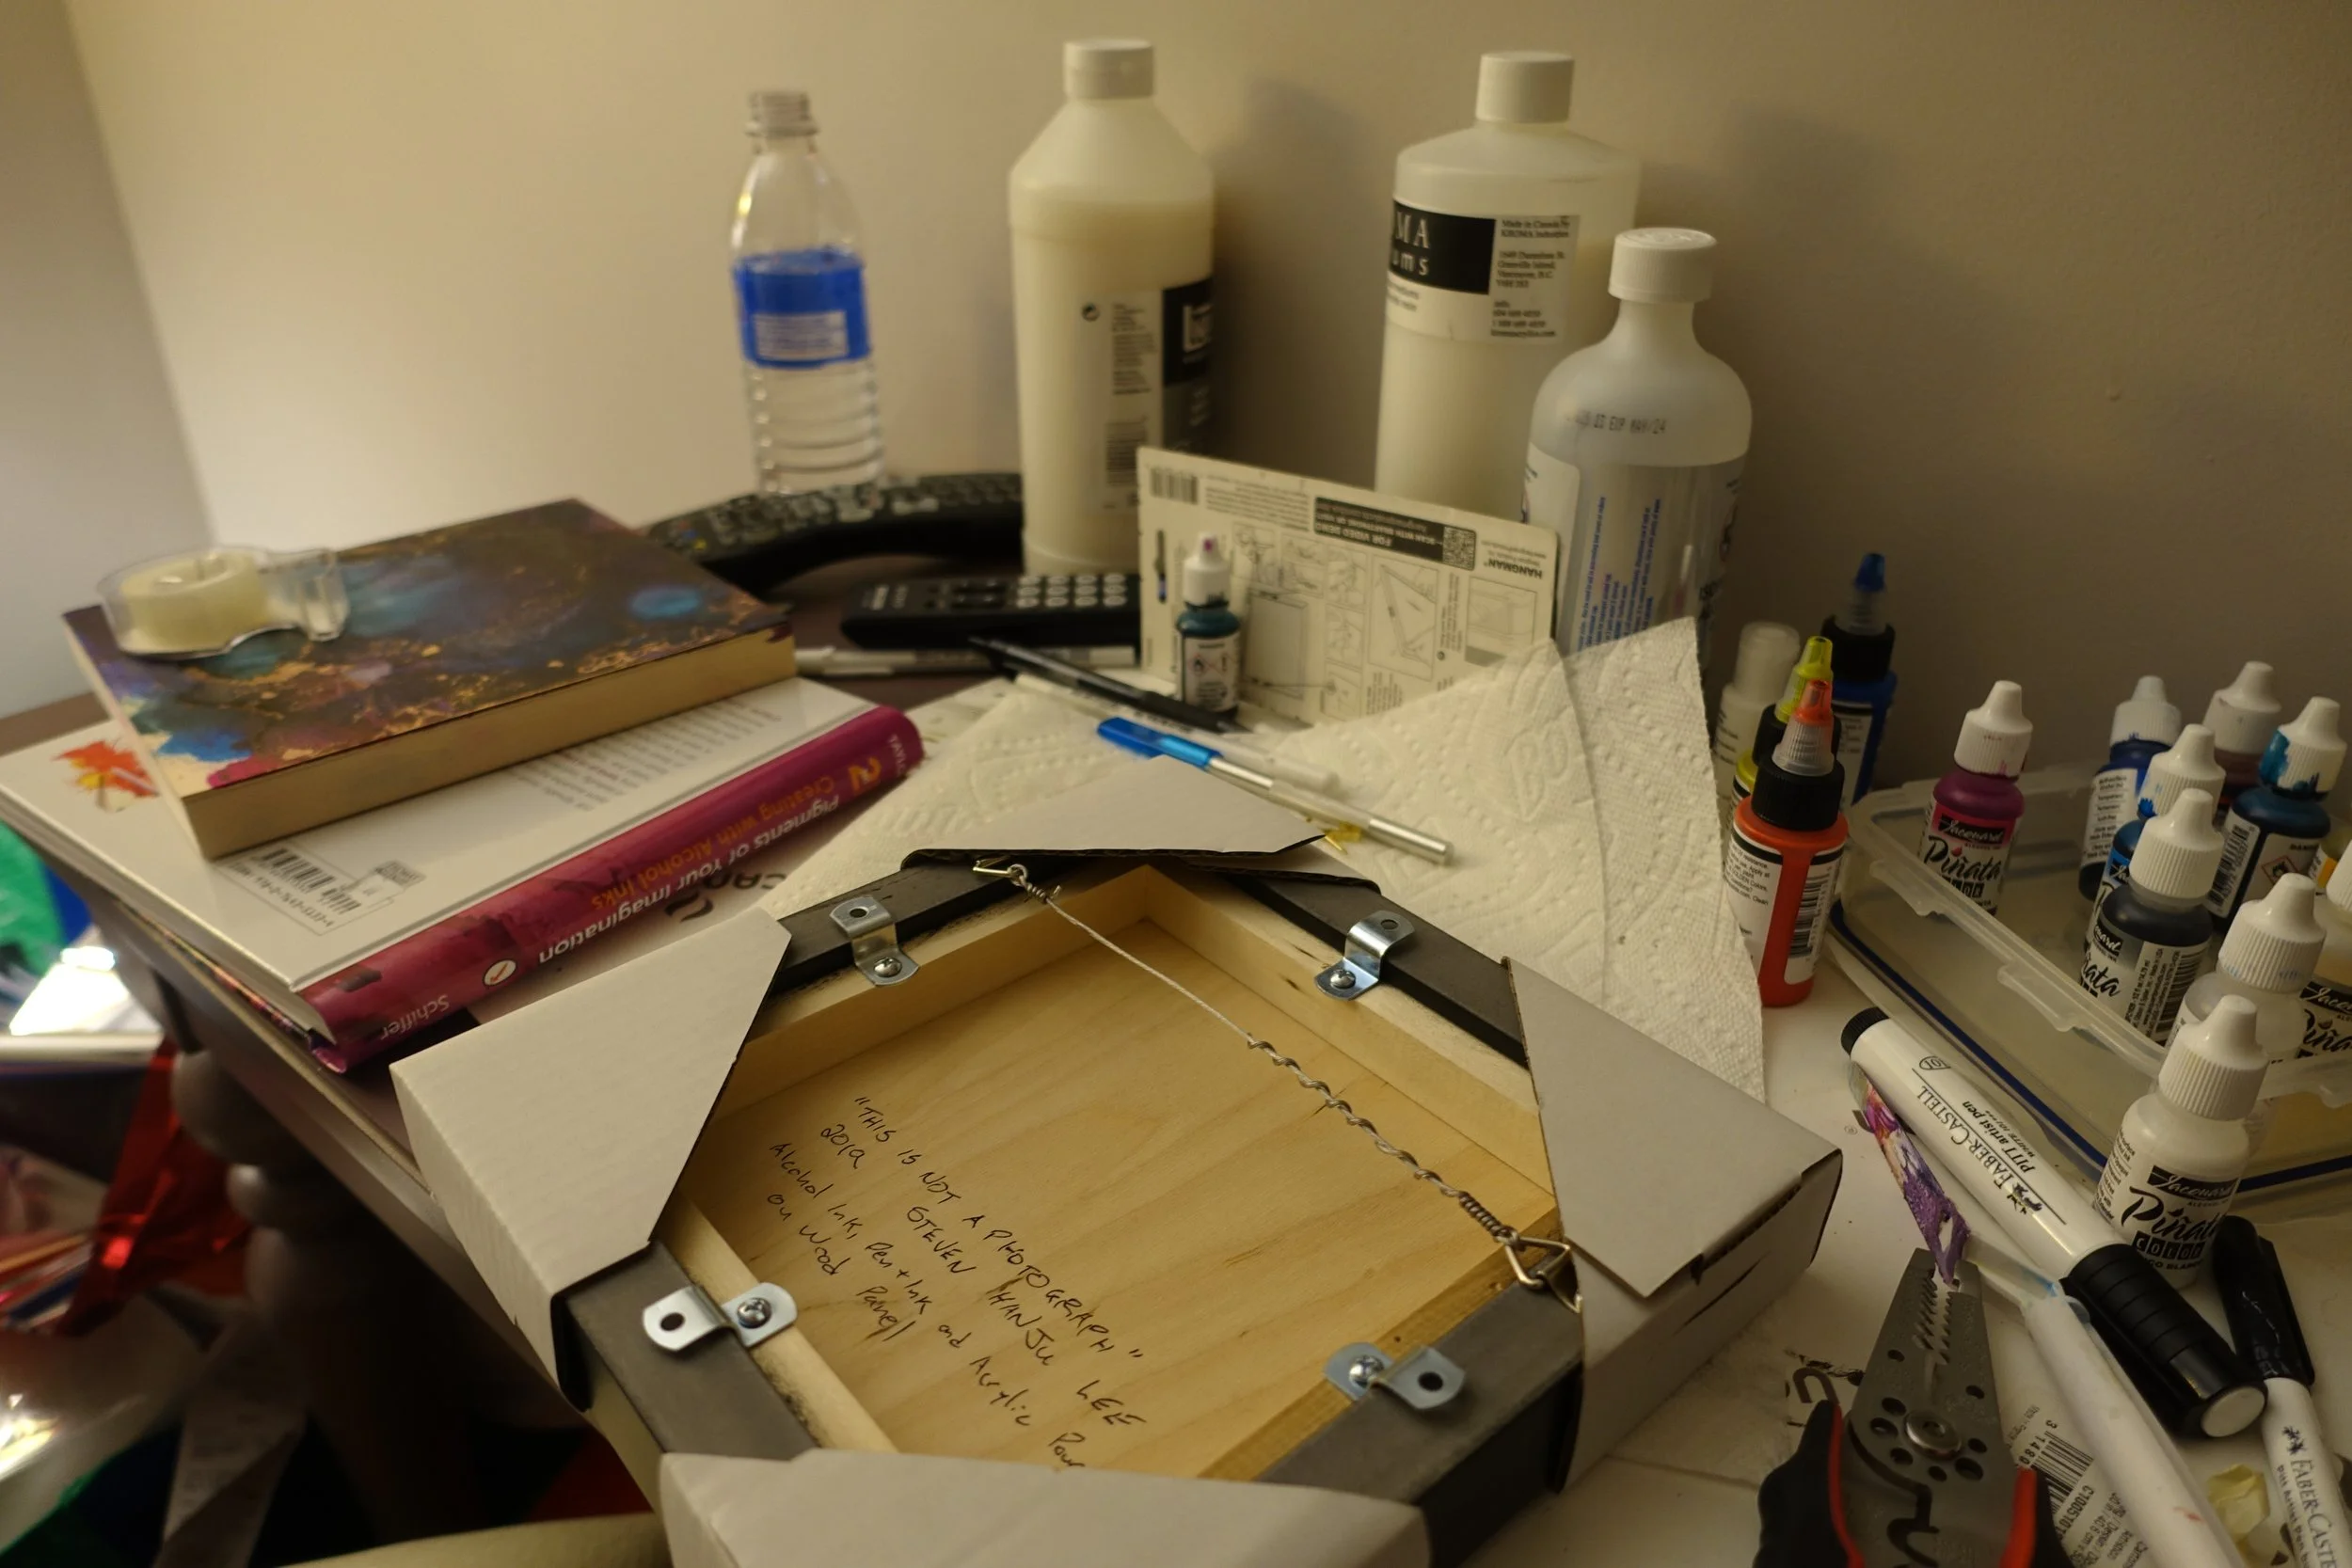
  • and, the second a photograph that creates a new set of relationships between elements in the scene, or creates a compositional clarity, or fragments elements in unusual ways by cutting them with the edge of the picture, or in which Verticality is essential to new content, or creates an abstract aspect, or a bit of all of those elements, entitled "FRAME".

Finally, upload a brief statement in which you describe two things:

  • first, the role that the place plays in your daily life (for example, "this is the park where I eat my lunch every day");

  • second, a Statement of 3-5 sentences describing the newly discovered creative content resulting from composition or content that you find in your Frame photograph.

“A Place of Creation” - This is a corner of the guest room at my Mom's house, where I've been staying lately, to help her out as she's been sick. I'm an artist and wanted to do some painting while staying there - so I ended up transforming the desk into a place where I can work on small canvases.

“The finished piece” - This is a corner of the guest room at my Mom's house, where I've been staying lately, to help her out as she's been sick. I'm an artist and wanted to do some painting while staying there - so I ended up transforming the desk into a place where I can work on small canvases.

SERIES TITLE: A Sense of Place

DATE: January 5, 2020

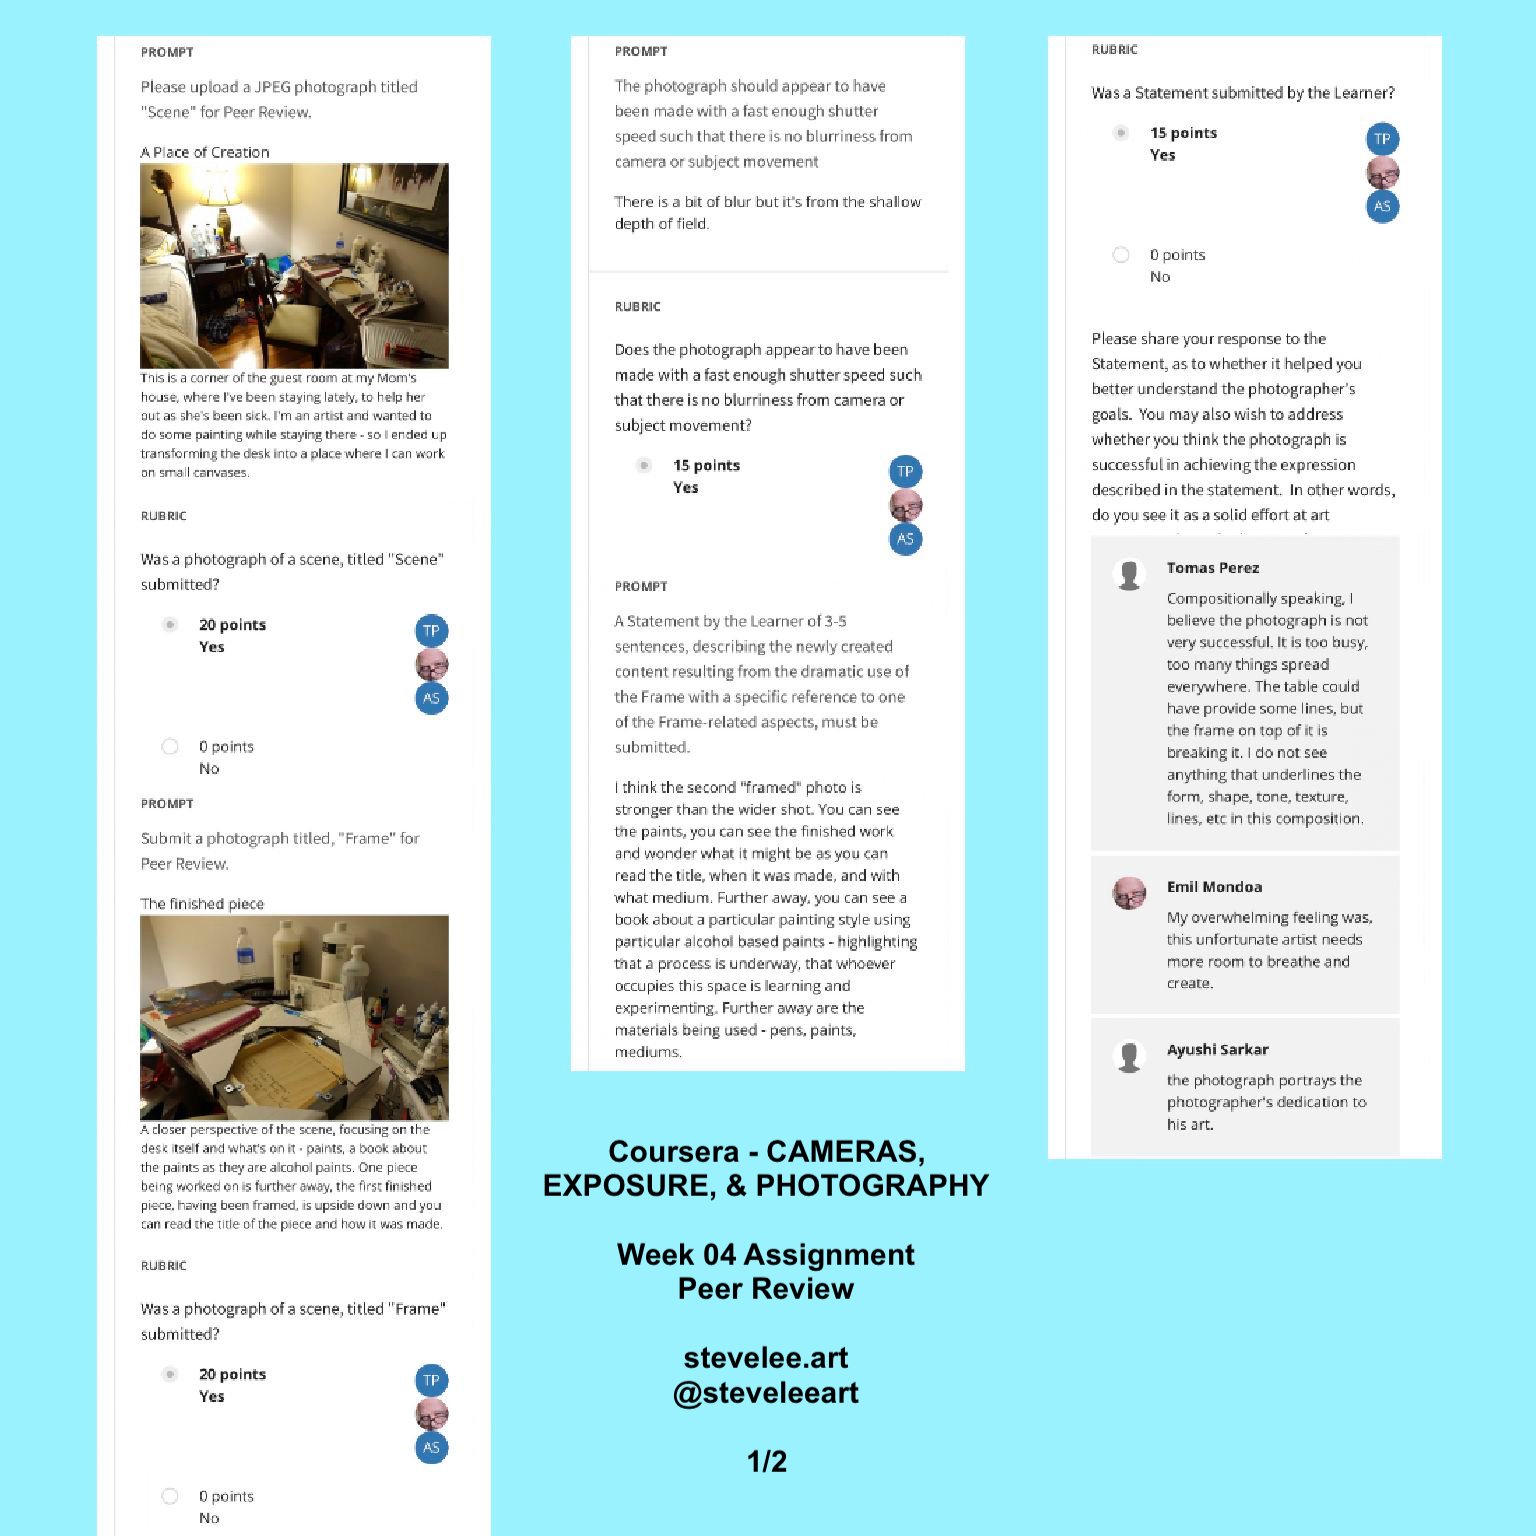
I think the second "framed" photo is stronger than the wider shot. You can see the paints, you can see the finished work and wonder what it might be as you can read the title, when it was made, and with what medium. Further away, you can see a book about a particular painting style using particular alcohol based paints - highlighting that a process is underway, that whoever occupies this space is learning and experimenting. Further away are the materials being used - pens, paints, mediums.

There is a bit of blur but it's from the shallow depth of field.

I think there is an unexpected connection between not being able to see the finished framed artwork that's on the desk, with the in process works. The photo has an overall compositional balance - I find my eye moves around the frame rather easily, there are enough details to hold an interest in what's there, to make people ask questions about what is going on, and who occupies this space.

The "Frame" photograph presents a workplace where creation and exploration happen. The tools of the artist are present, as are a work in progress and a finished piece which the viewer cannot see which lends a bit of mystery as to what was created. The title of the finished piece is clear - "This is not a photograph," which evokes the work of Rene Magritte, "The treachery of images (this is not a pipe)." The how-to book also shows that a process of learning is possibly at play.

Peer Review Feedback…

GRADE: 100%
Course Certificate of Completion

Course Completed on January 7, 2020

Overall Grade: 97%
Course 01, Week 02: CAMERA CAPABILITIES: DIFFERENCES AND SIMILARITIES

In Module Two we will survey different types of digital cameras that are in widespread use today, discuss their different capabilities and characteristics, and help you determine which might be most appropriate for the uses you plan to make of your photographs. Whether you need to make photographs to capture the important moments of personal experience with friends and family, or need to make photographs for purposes related to your employment or small business, you will find an overview of information to help you here. Along with the time you spend learning about cameras, you should continue to experiment with your own camera and your own interest in photography!

Assignment - Working a Scene in Program Mode

Set your camera or smartphone on Program Mode. Choose an ISO that will allow you to use a shutter speed of at least 1/60 second to help avoid blur from camera shake or movement of things in the scene. Discover a "scene" in your own neighborhood and "work it" in the same manner that Prof. Glendinning did in his lecture example. Your goal is to recognize what attracts you to a scene, and then discover a range of unexpectedly different pictures within that same scene. It may seem silly to have to state this, but please only submit photographs made by you yourself!

Work outdoors quickly and intuitively, taking no more than 10 minutes for photography, but making a lot of photographs as you hunt for new images in the space. Be very aware of how different vantage points give you different opportunities for composition and content changes. For some pictures use the "PLUS" and "MINUS" controls to purposely under and over expose a set of pictures of the same scene, so you can experiment with darker and lighter versions.

Pick two photographs to upload: one should be titled, "FIRST," which should be the first photograph you made of the scene that attracted you as you began this exercise. The other should be titled, "BEST," and it should be one of the photographs you made during the exercise of "working the scene" in which you found new content that is different from what first attracted you.

Your "best" photograph will have the following characteristics: it is well composed; the content of the picture is quite different from the first photograph of the scene; the tonal values of the scene are appropriate to the content of the photograph, whether dark, or light, or normal; the vantage point from which the picture is made plays an important role in its success. (JPEG FILE FORMAT ONLY, please no TIFF, PDF, or others!)

Finally, upload a Statement in which you give a brief description of what attracted you to the scene at first, and a description of the new content that you discovered in your "best" photograph after having worked the scene. Share how it is different in content, not just in the way it looks, from what attracted you to the place at first, whether that difference is subtle or large.

The first shot, taken in program auto mode of a corner of my Mother's house.

This was about my tenth photo of around twenty that I took of this particular area.

TITLE: Working an Outside Corner

DATE: December 30, 2019

I was attracted to the busy nature of the area in particular. It was a fairly compact area, tight, in that it was not a wide area of view. The tools looked interesting piled up against the wall in the corner, each one leaning and resting against the wall at their own angle. My first shot was a wide angle shot, a shot that took it all in, an establishing shot of sorts. From there, I worked in closer and got shots at different angles and heights, as well as at different distances from the objects. Eventually, I choose the shot I did because of how it was somewhat abstracted. It made you wonder a bit about what was there. It's not totally abstracted in that you can still identify the hose reel, you can see part of the top of the shovel. But the rest are just handles that create different leading lines take an eye in and out of the photograph.

There is not a lot of blurriness in the photograph, other than that created by the shallow depth of field (the wall I notice is slightly blurred as is the handle of the garden tool furthest back from the camera.

I took photos that were of the top of the handles, but they seemed to just sit their in the space of the photo. Photos of the tools resting on the ground felt a bit more interesting, but I could have pushed in closer I think, and gotten right onto the ground, even placing my camera on the cement. The middle again, was interesting, in part because of the flow from top to bottom. You can see the top of one handle leaning against the wall, and part of the bottom of the shovel. There was variety in the colour of the handles including the complementary combination of the red handle and the green handle. So it's kind of interesting overall. Maybe not the best but better than the original photo as it makes you look more.

Peer Review Feedback…

Course 01, Week 01: WELCOME, OVERVIEW, and FUNDAMENTALS

This journal will serve as a repository of the work I’m doing in Course 01: Cameras, Exposure, and Photography of the Michigan State University Coursera Specialization, Photography Basics and Beyond: From Smartphones to DSLRs.

Course 01, Week 01: Cameras, Exposure, and Photography - WELCOME, OVERVIEW, and FUNDAMENTALS

Welcome to the Module One of Course One, where we will begin our journey together to gain the knowledge and skills that will help you take control of your photography! The world of digital photography presents so many "tech" options that it can be quite confusing. Throughout this Course and Specialization, we will be sorting through the various functions, menus, and also the good old focus and exposure and camera craft aspects, so you can build a foundation for success. We'll start with some Basics, and keep building!

Assignment - Nice to Meet You!

This assignment is about beginning to define and share your goals as a photographer. Consider the following question: what is it that you have a passion to photograph? Is it family portraits or landscapes? Is it pure abstract creative expression, or documentation of your hobby? You may have many areas of photography that motivate you to pick up a camera, but for this assignment just choose one to explore for yourself and share with classmates. Unfortunately, because of previous acts of plagiarism, we must also make the following statement first: ONLY PHOTOGRAPHS THAT YOU HAVE PERSONALLY CREATED IN YOUR OWN CAMERA, NOT A PHOTOGRAPH MADE BY SOMEONE ELSE OR A PHOTOGRAPH OF ANOTHER PERSON'S PHOTOGRAPH, MAY BE USED FOR THIS AND ALL OF THE ASSIGNMENTS IN ANY OF THE COURSES IN THIS SPECIALIZATION. IF A LEARNER PRESENTS PHOTOGRAPHS OR WRITINGS THAT ARE NOT THEIR OWN IN RESPONSE TO ANY ASSIGNMENT, THAT WILL BE CAUSE FOR IMMEDIATE CANCELLATION WITHOUT REFUND.

To keep the focus on the content you are seeing, framing, composing, we will minimize the variations on exposure and focus settings by placing the camera in AUTO Exposure Mode. AUTO is symbolized by a Green Square, sometimes with a sidewards triangle inside. It is usually found on the camera's Exposure Mode Dial. Please do not "photoshop" your picture, simply upload the JPEG file created by the camera without alteration.

  1. Make a series of photographs that fit into a broad area of photography you would like to pursue. It can be any style or subject, as long as it is something that relates to your goals as a photographer. Pick one photograph that you feel is a success in composition and a success as an example of a type or style of photograph that motivated you to enroll in this Course. Your image file must be in JPEG FORMAT ONLY... or you will risk being unable to receive feedback on your pictures in this assignment and all those in the future. Please no RAW, TIFF, PDF, or other formats.

  2. Write a Statement of from 3 to 5 sentences describing the area of photography that interests you most, and explain why it interests you. For example, someone might write, "I am interested in the subject of food. I would like to write a blog on the restaurants I visit and illustrate it with my photographs. Gaining more control of my camera will help me make the pictures of food that my readers will enjoy."

3. Give your photograph a title (not "Untitled") that will give the viewer an additional level of content, to add to the meaning of the picture.

4. Upload your Statement and a photograph (again, JPEG FILE FORMAT ONLY please!) to the Peer Review area

5. Respond to your fellow Learners' photographs in Peer Review with complete sentences that address clear points of content, composition, and camerawork!

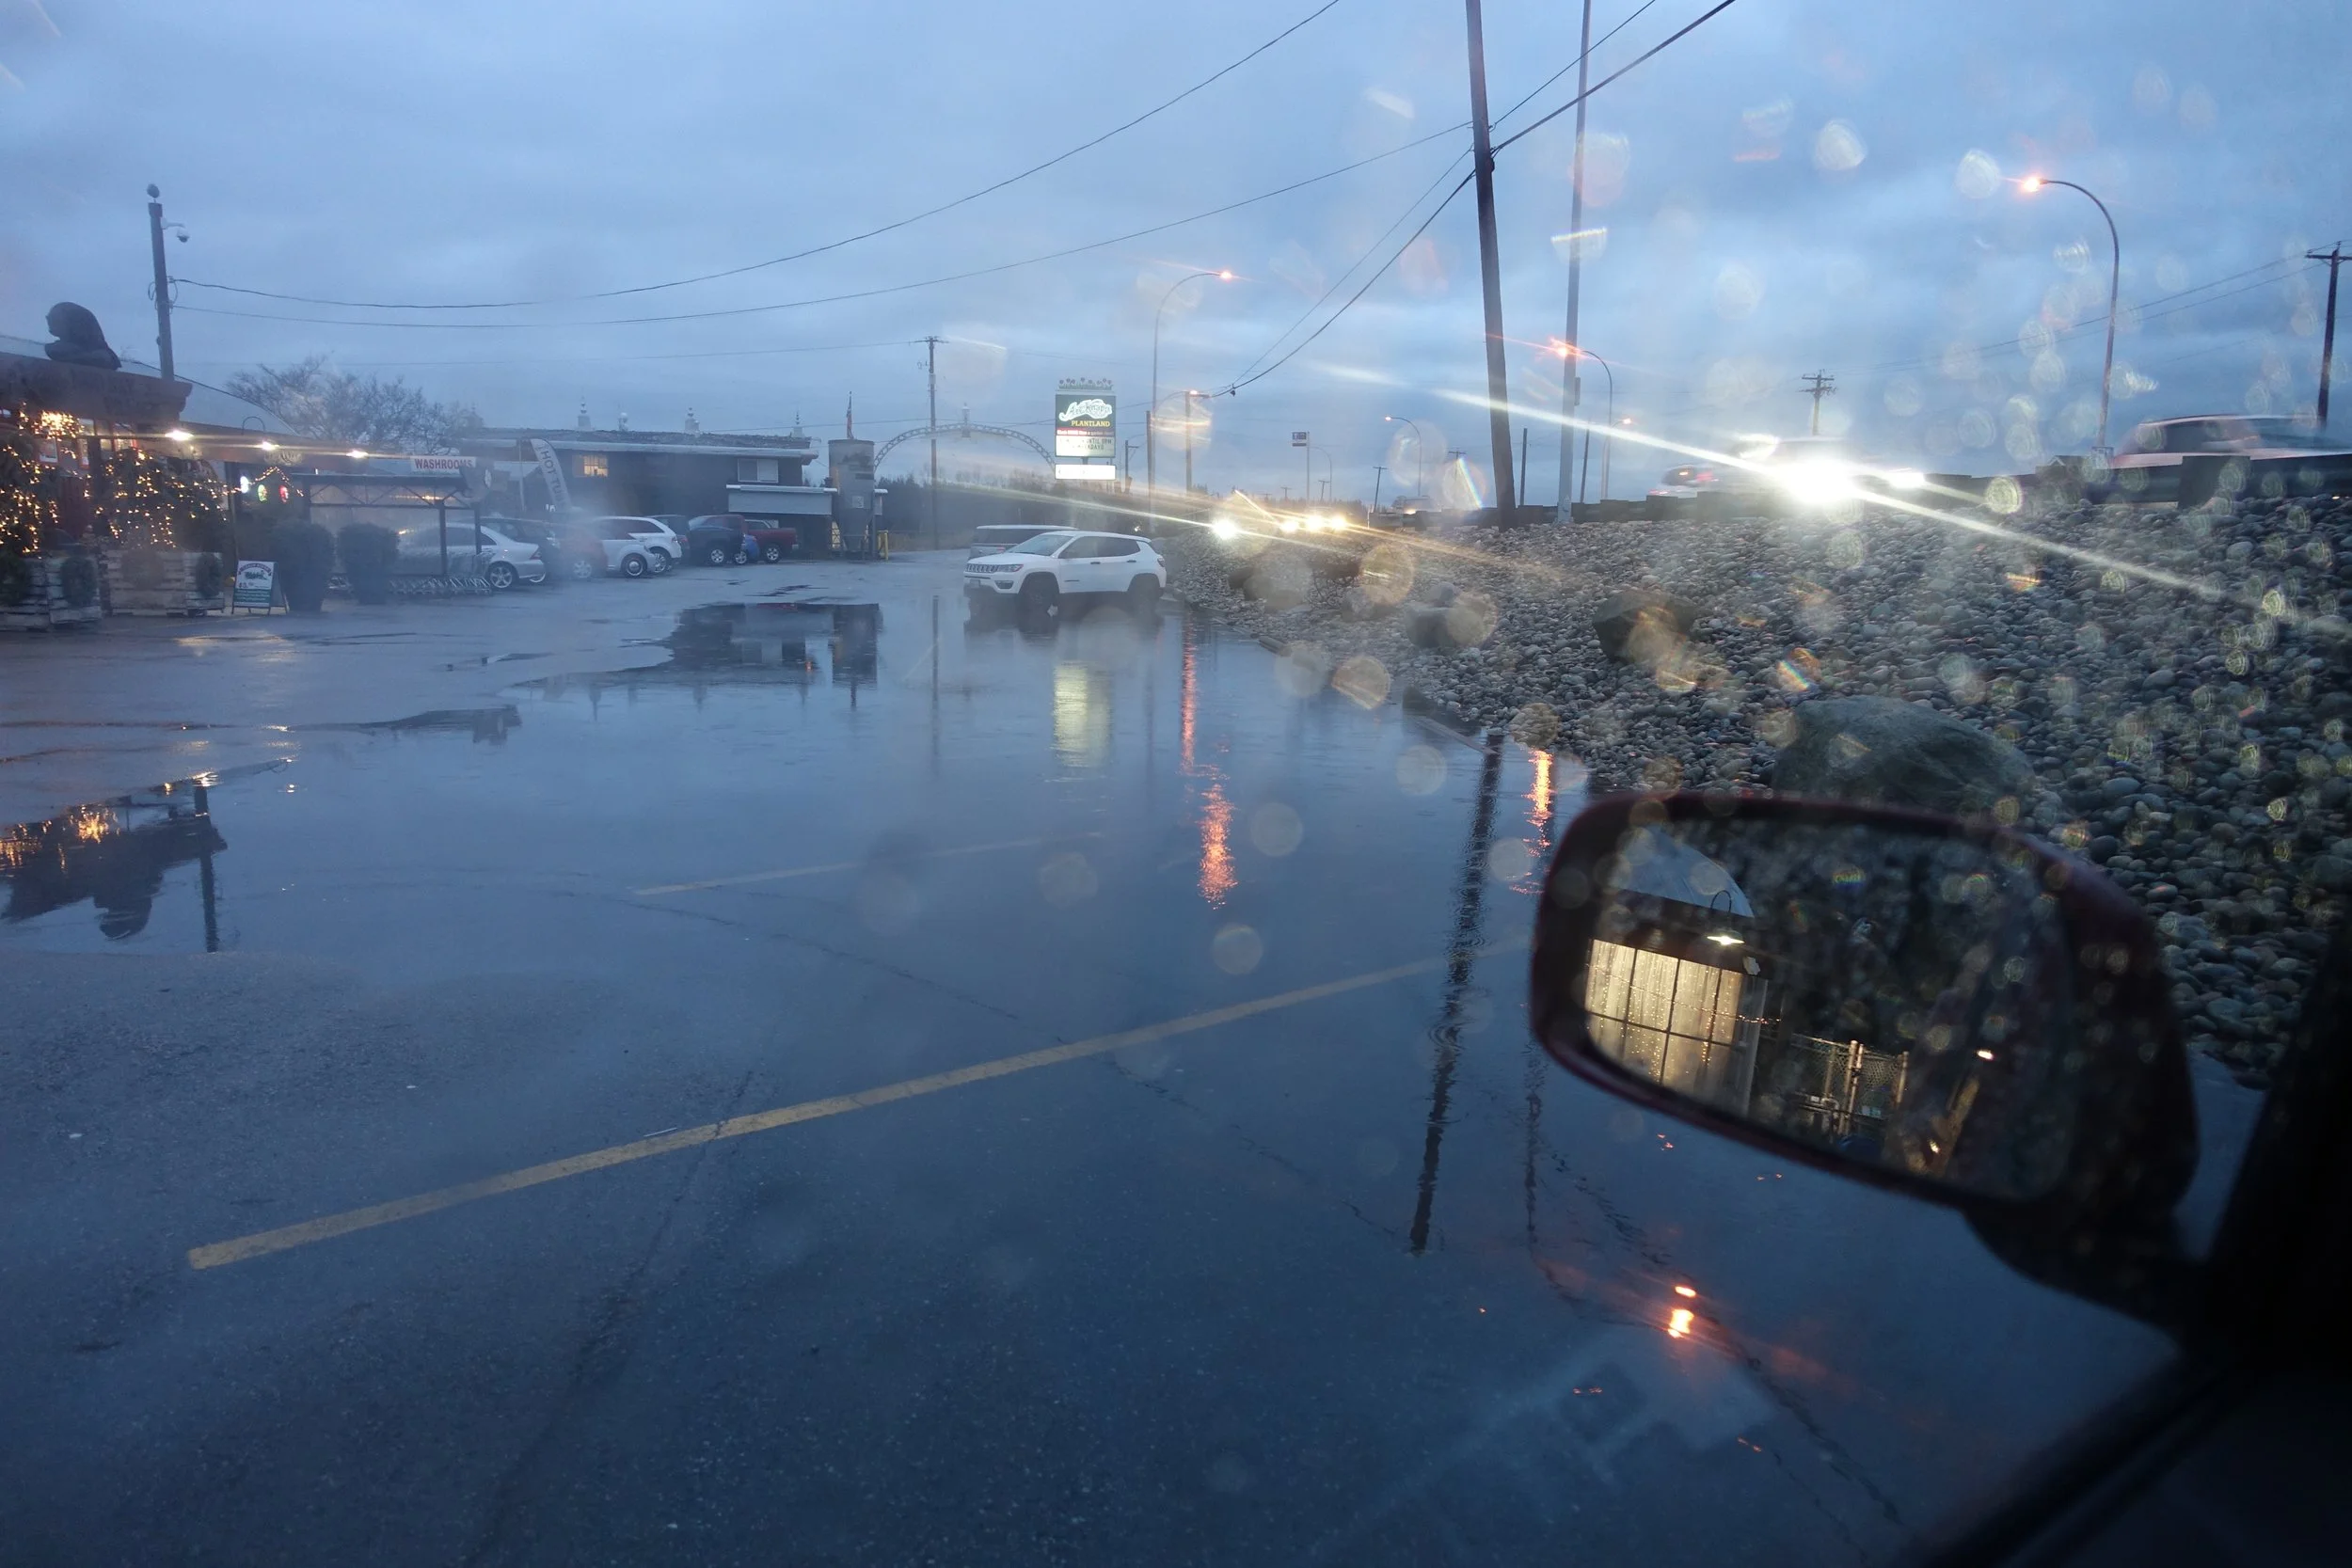
A photograph taken at the ART KNAPP NURSERY parking lot in Surrey, British Columbia, Canada, at dusk, following a heavy downpour which left a large portion of the parking lot flooded. Every fall this nursery is transformed into a place where holiday Christmas decorations and trees can be purchased.

TITLE: HOLIDAY SHOPPING BLUES

DATE: December 12, 2019

Unedited digital photograph shot using the automatic setting on a Sony CyberShot RX100III, through the closed window of an SUV.


With this course, I want to not only improve my photography on a formal level but on a conceptual level as well. To this end, one theme I am interested in exploring through photography is the concept of consumerism. Specifically, I am interested in the aspects of consumerism geared around the holiday season between the start of Black Friday sales in the USA through to the end of Boxing Day / Week sales here in Canada. Formally, I'm interested in exploring this topic through a sort of fine art documentary photographic approach, which could even see elements of street photography brought indoors. 


With the specific image I shot for this first submission, I drew a bit of inspiration from photographer Abbas Kiastami, who played with shooting photographs through rain soaked car windows in his 2005 series ROADS & RAIN. I like the approach of being able to shoot through things in the real world that can serve as a found filter of sorts. Other photographers who have done this include Sam Abell, who has shot scenes through objects such as fish tanks and curtains; or Arthur Meyerson, who has shot through a waterfall in a shopping area, and through a wall of bricks with a repeated pattern that let you see through it. I also drew inspiration from Lee Friedlander, who shot photographs across America from inside his car in a series called AMERICA BY CAR. 


This is not necessarily the way I might shape an entire body of work over the course of this term, but it definitely helped create a bit of mystery, and depth to the photo including a sense of loneliness that I liked. 


I think the composition helps create a well organized visual statement. There is depth to the photograph, from the car window that is closest to us, to the large, flooded parking lot and the busy highway to the right of frame, to the hills off in the distance. White holiday lights are seen to the left of frame which gives the suggestion of some kind of store featuring holiday goods but it's not overtly in your face. The light of the cars is perhaps a bit too blown out, but this shot was very much grounded in a snapshot aesthetic. It was meant to be quick and dirty. My camera has a RAW and JPG version of this and this is the JPG version right off of the camera, as taken in full auto, no post processing. I took about six or seven photos in this spot, some with the window rolled up, some with the window down. Some with cars passing through the parking lot, and others with no cars driving through the lot like this one. I don't think any of these shots had people in them.

This was also posted on Instagram.

PEER REVIEW FEEDBACK…

Grade: 85%